Some of the most significant changes in Python 3 are related to metaprogramming. In this tutorial, I'll cover decorators, class decorators, descriptors, and metaclasses. However, the focus will be on idioms and examples that are only....
Tuesday 21 May 2013
Friday 17 May 2013
Raspberry Pi Wireless Attack Toolkit
Raspberry Pi Wireless Attack Toolkit
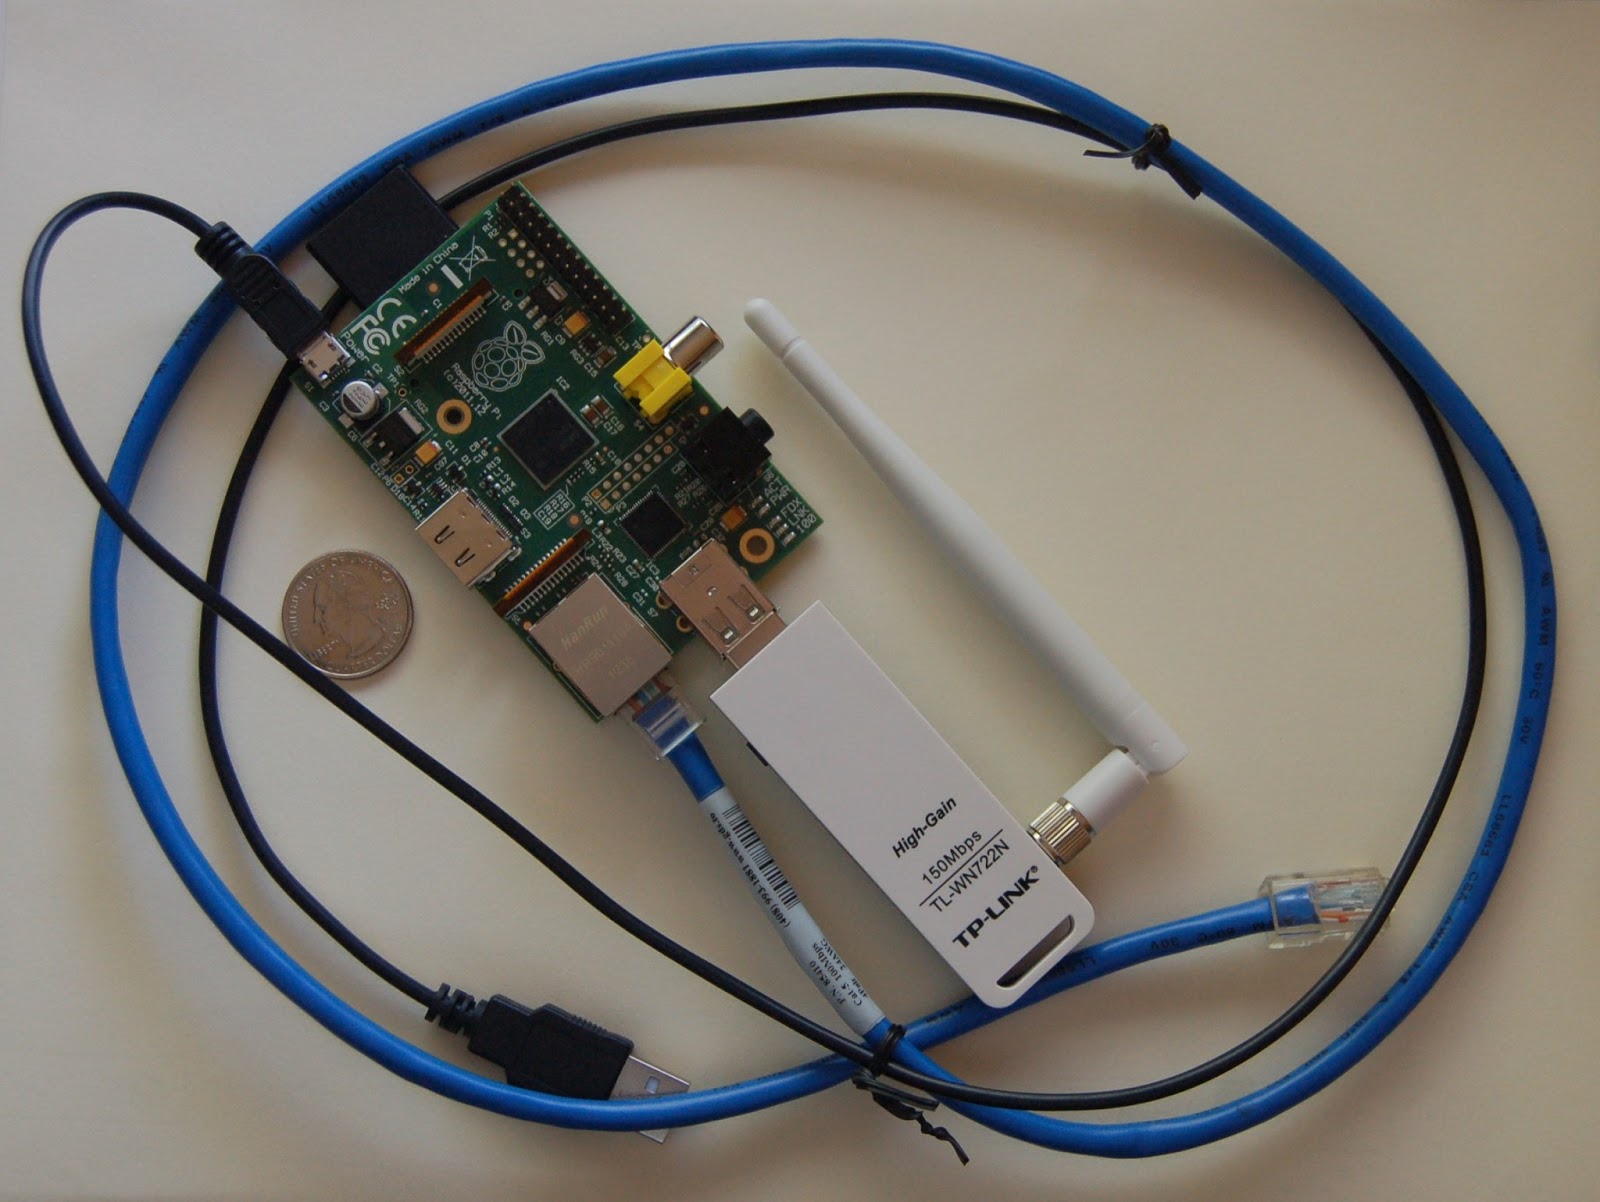
A collection of pre-configured or automatically-configured tools that automate and ease the process of creating robust Man-in-the-middle attacks. The toolkit allows your to easily select between several attack modes and is specifically designed to be easily extendable with custom payloads, tools, and attacks.
The cornerstone of this project is the ability to inject Browser Exploitation Framework Hooks into a web browser without any warnings, alarms, or alerts to the user.
The cornerstone of this project is the ability to inject Browser Exploitation Framework Hooks into a web browser without any warnings, alarms, or alerts to the user.
We accomplish this objective mainly through wireless attacks, but also have a limpet mine mode with ettercap and a few other tricks.
Limpet Mine Mode:
Poisons a network with ettercap + runs MITM Attacks
Poisons a network with ettercap + runs MITM Attacks
Passive Wireless Mode:
Free Wifi anyone?
Free Wifi anyone?
Agressive Wireless Mode:
Become every access point with hostapd-karma
Become every access point with hostapd-karma
Once the RaspberryPi becomes the gateway, it fires up a MITM DNS server, metasploit, BEEF, and an injection proxy server for HTTP which injects the BEEF hook. From there, you log into the beef console and start popping shell.
It's in Alpha, so complain about things you want to see in it now.
Frequently Asked Questions:
How do I install this?
How do I Put Cellular Internet onto the Pi
What Hardware Should I Get?
What is Included in The Toolkit?
Why Doesn't Airdrop Work?
You Just Glued Software Together, This Isn't Original
How do I install this?
How do I Put Cellular Internet onto the Pi
What Hardware Should I Get?
What is Included in The Toolkit?
Why Doesn't Airdrop Work?
You Just Glued Software Together, This Isn't Original
Project Members:
- Bryan "Crypt0s" Halfpap (admin)
Download the Raspeberry Pi ISO here
Thursday 16 May 2013
Update script working with Backtrack 5
I could not find an update script working with Backtrack 5 so I decided to make a quick one.
Updated version: 2.0
Changelog Version 2.0
Screenshot:

If you know more tools I could add to the script in order to update them please feel free to post them here.
Also if you find any bugs or have any feedback feel free to contact me in this thread. I will update the thread with each update to the script.
NOTE: Please make sure you understand what the script does before running it.
Enjoy!
Updated version: 2.0
Changelog Version 2.0
Code:
* Reviewed all tools.
* Compatible with Backtrack 5 R2/R3.
* Removed the menu.
Code:
git clone git://github.com/sickn3ss/backtrack_update.git
cd backtrack_update
chmod a+x backtrack5_update.py
./backtrack5_update.py
If you know more tools I could add to the script in order to update them please feel free to post them here.
Also if you find any bugs or have any feedback feel free to contact me in this thread. I will update the thread with each update to the script.
NOTE: Please make sure you understand what the script does before running it.
Enjoy!
Monday 13 May 2013
How to Upgrade Wine from the Older version to Wine1.5 on uBuntu
I am new to Wine and anything like it. I want to run the application "ATCS Monitor". When I installed ATCS Monitor I received an error message:
C:\windows\system32\wshom.ocx
Unable to register the DLL/OCX: RegSvr32 failed with exit code 0x1
-From Terminal-
err:typelib:sltg_get_typelib_ref Unable to find reference
err:module:import_dll Library ScrRun.dll (which is needed by L"C:\\windows\\system32\\wshom.ocx") not found
I can get through it by just ignoring it but I then have errors in ATCS Monitor.
First, upgrade to Wine 1.3.35. Wine 1.2.3 is almost a year old and is
missing some very important updates.
Second, do a search for the file in the directory $HOME/.wine I suspect
that either it is not there or it is in the same directory as where the
program installed. ...
Ubuntu and Ubuntu derivatives (such as Kubuntu) obtain software from packages which are stored in repositories. Ubuntu's default repository includes Wine, however if you want to stay up to date with the latest Wine package you can use WineHQ's by following these instructions.
Adding the WineHQ PPA Repository:
Open the Software Sources menu by launching the Ubuntu Software Center and selecting Edit->Software Sources. Choose the Other Software tab and click Add.
Then, copy and paste the line below.
ppa:ubuntu-wine/ppaWarning: Beta packages
The 1.5 packages here are beta packages. This means they will periodically suffer from regressions, and as a result an update may break functionality in Wine. If the stable 1.4 Wine version works for you, then you may not want to use these beta packages.
Installing Wine:
Once you have added the WineHQ PPA Repository, you are ready to install.
To get the most recent Wine 1.5 beta, click this link to install the wine1.5 package.
To install the older, stable Wine 1.4 version, click this link to install the wine1.4 package.
Upgrading to a new version of Ubuntu
If you are upgrading the entire system, such as going from Ubuntu 11.10 to 12.04, you will need to come back to this page and add the repository again. The built in update manager will not switch the Wine repository automatically.
Alternative Command Line Instructions for Installing Wine:
It is also possible to add the Wine PPA and install via the terminal. This may be useful on Kubuntu, Xubuntu, and other Ubuntu derivatives.
sudo add-apt-repository ppa:ubuntu-wine/ppa
Then update APT package information by running 'sudo apt-get update'. You can now install Wine by typing 'sudo apt-get install wine1.5'.
If you'd like to browse the PPA manually, you can visit its Launchpad page.
Thursday 4 April 2013
HOW TO Solve issue Nvidia & X.org Server Problems on Linux or BackTrack5

I spent a week trying to resolve the error generated by X.org Server and Nvidia drivers, and I think I've finally solved.
This is the solution for my Nvidia GT540M & Intel i7-2670QM (ASUS X53SV-SX598V)
1. Download NVIDIA driver from here: http://www.nvidia.com/object/unix.html.
I use Linux x86_64/AMD64/EM64T (NVIDIA-Linux-x86_64-285.05.09.run) for my system at 64bit
2. Install system updates
3. Install linux-header to the upgraded kernelCode:sudo apt-get update && sudo apt-get upgrade
4. If dkms and build essential haven't been installedCode:sudo apt-get install linux-headers-$(uname -r)
5. Open blacklist.conf file to add some lines (I use vi command)Code:sudo apt-get install dkms build-essential
6. Press i and after others “blacklist” list add this listCode:vi /etc/modprobe.d/blacklist.conf
7. After that, press ESC and type :wq (this write the file)Code:blacklist vga16fb blacklist nouveau blacklist rivafb blacklist nvidiafb blacklist rivatv
8. Make grub.cfg writable
9. Open grub.cfg fileCode:chmod +w /boot/grub/grub.cfg
10. Find text splash text inside the document and add nouveau.modeset=0 text like thisCode:vi /boot/grub/grub.cfg
11. After that, press ESC and type :wq (this write the file)Code:text splash nouveau.modeset=0 vga=791
12. Disable writable mode to grub.cfg file
13. Update grub.cfg fileCode:chmod -w /boot/grub/grub.cfg
14. RebootCode:update-grub
15. Login and don’t write startx
16. Remove all previous Nvidia drivers
17. Remove default driversCode:sudo apt-get --purge remove nvidia-*
18. Chmod the nvidia driver fileCode:sudo apt-get --purge remove xserver-xorg-video-nouveau
19. Run the nvidia driver*Code:chmod a+x NVIDIA-Linux-x86_64-285.05.09.run
*If you use a 64bit system don’t install the OpenGL 32bitCode:sh ./NVIDIA-Linux-x86_64-285.05.09.run
20. Reboot
If you have a problem like this:
Code:X.Org X Server 1.7.6 Release Date: 2010-03-17 X Protocol Version 11, Revision 0 Build Operating System: Linux 2.6.24-28-server x86_64 Ubuntu [...] Fatal server error: no screens found
It means that the automatic writing of xorg.conf (nvidia-xconfig command) during installation is not successful., but the driver has been installed correctly.
To solve this problem just delete the xorg.conf file:
When you restart the PC the file xorg.conf file will be created automatically.Code:rm /etc/X11/xorg.conf
Reebot and type
I hope it helpsCode:startx

Subscribe to:
Posts (Atom)
How to Create a Ansible Lab on your Local Machine using Vagrant in 5 min using ChatGPT
This is an exciting experiment of mine as DevOps. As I am experimenting with the Tools available ... So, the quest is to " Vagrantfile ...

-
How To Hide and unhide the hard disk Volumes using CMD Commands : First check how many drives are there in my computer and then s...
-
VMWare Workstation doesn't ship in a deb, so it isn't registered in dpkg (which is why you can't find it in the software center...
-
Issue: You go to activate Microsoft Office 2010 and you receive a message stating, “Your copy of Microsoft Office Professional Plus 2010 ca...

