Showing posts with label systems. Show all posts

Friday, 29 September 2017

Working with PuppetLabs Using Vagrant


While working as DevOps Engineer one of the tools by definition that we use more, often is Puppet. Guess most people will think that you are 100% expert, which is not always the case. So, I need to create this post and track record of my own experiments with Puppet and (PuppetLabs + Vagrant)

You might as what is Vagrant ?
==> "Vagrant is an open-source software product for building and maintaining portable virtual software development environments, e.g. for VirtualBox, Hyper-V, Docker, VMware, and AWS. ... Vagrant simplifies the necessary software configuration management in order to increase development productivity. " read more here: https://www.vagrantup.com/intro/index.html

The initial indentation was to gain better understanding puppet file structure. So, I decided to use Puppetlabs for this ...


So, basically. I did create installed

  • Installed Vagrant
  • Used the Vagrant init command to pull the puppetlabs ubuntu VM
  • Which created a file "Vagrantfile"
  • created a dir puppetlabs


And then started the Setup, so here are the Logs ..

Tdls-Air:puppetlabs psalms91$ vagrant up
Bringing machine 'default' up with 'virtualbox' provider...
==> default: Box 'puppetlabs/ubuntu-16.04-32-puppet' could not be found. Attempting to find and install...
    default: Box Provider: virtualbox
    default: Box Version: 1.0.0
==> default: Loading metadata for box 'puppetlabs/ubuntu-16.04-32-puppet'
    default: URL: https://vagrantcloud.com/puppetlabs/ubuntu-16.04-32-puppet
==> default: Adding box 'puppetlabs/ubuntu-16.04-32-puppet' (v1.0.0) for provider: virtualbox
    default: Downloading: https://vagrantcloud.com/puppetlabs/boxes/ubuntu-16.04-32-puppet/versions/1.0.0/providers/virtualbox.box
==> default: Successfully added box 'puppetlabs/ubuntu-16.04-32-puppet' (v1.0.0) for 'virtualbox'!
==> default: Importing base box 'puppetlabs/ubuntu-16.04-32-puppet'...
==> default: Matching MAC address for NAT networking...
==> default: Checking if box 'puppetlabs/ubuntu-16.04-32-puppet' is up to date...
==> default: Setting the name of the VM: puppetlabs_default_1506687306250_65705
==> default: Clearing any previously set network interfaces...
==> default: Preparing network interfaces based on configuration...
    default: Adapter 1: nat
==> default: Forwarding ports...
    default: 22 (guest) => 2222 (host) (adapter 1)
==> default: Booting VM...
==> default: Waiting for machine to boot. This may take a few minutes...
    default: SSH address: 127.0.0.1:2222
    default: SSH username: vagrant
    default: SSH auth method: private key
    default:
    default: Vagrant insecure key detected. Vagrant will automatically replace
    default: this with a newly generated keypair for better security.
    default:
    default: Inserting generated public key within guest...
    default: Removing insecure key from the guest if it's present...
    default: Key inserted! Disconnecting and reconnecting using new SSH key...
==> default: Machine booted and ready!
==> default: Checking for guest additions in VM...
    default: The guest additions on this VM do not match the installed version of
    default: VirtualBox! In most cases this is fine, but in rare cases it can
    default: prevent things such as shared folders from working properly. If you see
    default: shared folder errors, please make sure the guest additions within the
    default: virtual machine match the version of VirtualBox you have installed on
    default: your host and reload your VM.
    default:
    default: Guest Additions Version: 5.0.20
    default: VirtualBox Version: 5.1
==> default: Mounting shared folders...
    default: /vagrant => /Users/psalms91/Vagrant_VM/puppetlabs
Tdls-Air:puppetlabs psalms91$

Tdls-Air:puppetlabs psalms91$ vagrant ssh

Welcome to Ubuntu 16.04 LTS (GNU/Linux 4.4.0-21-generic i686)

 * Documentation:  https://help.ubuntu.com/

vagrant@localhost:~$

After this I have my Puppet Labs VM running ... After this point was easy, I just needed to goo into the puppet installation dir and look into the dir structure.


done.. :-)

Friday, 28 July 2017

Reset Your Forgotten Ubuntu Password in 2 Minutes or Less


If you’ve ever forgotten your password, you aren’t alone… it’s probably one of the most common tech support problems I’ve encountered over the years. Luckily if you are using Ubuntu they made it incredibly easy to reset your password.
image
All it takes is adjusting the boot parameters slightly and typing a command or two, but we’ll walk you through it.
Reset Your Ubuntu Password
Reboot your computer, and then as soon as you see the GRUB Loading screen, make sure to hit the ESC key so that you can get to the menu.
image
Root Shell – Easy Method
If you have the option, you can choose the “recovery mode” item on the menu, usually found right below your default kernel option.
image[3]
Then choose “Drop to root shell prompt” from this menu.
image[6]
This should give you a root shell prompt.
Alternate Root Shell Method
If you don’t have the recovery mode option, this is the alternate way to manually edit the grub options to allow for a root shell.
First you’ll want to make sure to choose the regular boot kernel that you use (typically just the default one), and then use the “e” key to choose to edit that boot option.
image
Now just hit the down arrow key over to the “kernel” option, and then use the “e” key to switch to edit mode for the kernel option.
image
You’ll first be presented with a screen that looks very similar to this one:
image
You’ll want to remove the “ro quiet splash” part with the backspace key, and then add this onto the end:
rw init=/bin/bash
image
Once you hit enter after adjusting the kernel line, you’ll need to use the B key to choose to boot with that option.
image
At this point the system should boot up very quickly to a command prompt.
Changing the Actual Password
You can use the following command to reset your password:
passwd <username>
For example my username being geek I used this command:
passwd geek
image
After changing your password, use the following commands to reboot your system. (The sync command makes sure to write out data to the disk before rebooting)
sync
reboot –f
I found that the –f parameter was necessary to get the reboot command to work for some reason. You could always hardware reset instead, but make sure to use the sync command first.
And now you should be able to login without any issues.

Tuesday, 30 July 2013

Issues with VMware 8 wont run Kernel 3.8 wont let VMware 8 & 9 work


When I try to launch VMware workstation, I get the following error:
Before you can run VMware, several modules must be compiled and loaded into the kernel CANCEL / INSTALL

No errors, when I select INSTALL nothing happens just closes.
I install manually:
sudo apt-get install open-vm-tools open-vm-tools-dev open-vm-dkms open-vm-toolbox open-vm-tools-dev
But already installed to the latest versions.
I will start a bounty to fix this.
Ubuntu 13.04 64bit

pst007x@pst007x-Serval-Professional:~$ uname -a
Linux pst007x-Serval-Professional 3.9.0-030900-generic #201304291257 SMP Mon Apr 29 16:58:15 UTC 2013 x86_64 x86_64 x86_64 GNU/Linux

I have uninstalled and reinstalled all components, but same problem.
I have tried a different Kernel, but end up with the same problem.

Tried this as suggested: here

#!/bin/bash
cd
cp -prn /usr/lib/vmware/modules/source /usr/lib/vmware/modules/source-backup
mkdir fixed
cd fixed
find /usr/lib/vmware/modules/source -name "*.tar" -exec tar xf '{}' \;

## add missing header on kernels
sed -i '/#include "compat_wait.h"/a\#include "compat_sched.h"' vmnet-only/vnetUserListener.c
sed -i '/#include "compat_page.h"/a\#include "compat_sched.h"' vmci-only/include/pgtbl.h
## comment out an invalid definition
sed -i 's|\(extern void poll_initwait(compat_poll_wqueues \*);\)|//\1|' *-only/include/compat_wait.h

tar cf vmblock.tar vmblock-only
tar cf vmci.tar vmci-only
tar cf vmmon.tar vmmon-only
tar cf vmnet.tar vmnet-only
tar cf vmppuser.tar vmppuser-only
tar cf vsock.tar vsock-only

cp -p *.tar /usr/lib/vmware/modules/source

cd /lib/modules/`uname -r`/build/include/linux
ln -s ../generated/autoconf.h
ln -s ../generated/utsrelease.h
cd

vmware-modconfig --console --install-all

# clean up
cd
rm -rf fixed
cd /lib/modules/`uname -r`/build/include/linux
rm autoconf.h utsrelease.h
cd /usr/lib/vmware/modules/
rm -rf source-backup
cd

Didn't work, results of script in terminal:

pst007x@pst007x-Serval-Professional:~/Desktop$ sudo ./run
[sudo] password for pst007x: 
sed: can't read vmci-only/include/pgtbl.h: No such file or directory
sed: can't read *-only/include/compat_wait.h: No such file or directory
tar: vmppuser-only: Cannot stat: No such file or directory
tar: Exiting with failure status due to previous errors
ln: failed to create symbolic link ‘./autoconf.h’: File exists
ln: failed to create symbolic link ‘./utsrelease.h’: 

File exists
Stopping VMware services:
   VMware Authentication Daemon                                        done
   VM communication interface socket family                            done
   Virtual machine communication interface                             done
   Virtual machine monitor                                             done
   Blocking file system                                                done
Using 2.6.x kernel build system.

make: Entering directory `/tmp/modconfig-tGleah/vmmon-only'
/usr/bin/make -C /lib/modules/3.9.0-030900-generic/build/include/.. SUBDIRS=$PWD SRCROOT=$PWD/. \
      MODULEBUILDDIR= modules
make[1]: Entering directory `/usr/src/linux-headers-3.9.0-030900-generic'
  CC [M]  /tmp/modconfig-tGleah/vmmon-only/linux/driver.o
  CC [M]  /tmp/modconfig-tGleah/vmmon-only/linux/driverLog.o
  CC [M]  /tmp/modconfig-tGleah/vmmon-only/linux/hostif.o
  CC [M]  /tmp/modconfig-tGleah/vmmon-only/common/apic.o
  CC [M]  /tmp/modconfig-tGleah/vmmon-only/common/comport.o
  CC [M]  /tmp/modconfig-tGleah/vmmon-only/common/cpuid.o
  CC [M]  /tmp/modconfig-tGleah/vmmon-only/common/hashFunc.o
  CC [M]  /tmp/modconfig-tGleah/vmmon-only/common/memtrack.o
  CC [M]  /tmp/modconfig-tGleah/vmmon-only/common/phystrack.o
  CC [M]  /tmp/modconfig-tGleah/vmmon-only/common/task.o
  CC [M]  /tmp/modconfig-tGleah/vmmon-only/common/vmx86.o
  CC [M]  /tmp/modconfig-tGleah/vmmon-only/vmcore/moduleloop.o
  LD [M]  /tmp/modconfig-tGleah/vmmon-only/vmmon.o
  Building modules, stage 2.
  MODPOST 1 modules
  CC      /tmp/modconfig-tGleah/vmmon-only/vmmon.mod.o
  LD [M]  /tmp/modconfig-tGleah/vmmon-only/vmmon.ko
make[1]: Leaving directory `/usr/src/linux-headers-3.9.0-030900-generic'
/usr/bin/make -C $PWD SRCROOT=$PWD/. \
      MODULEBUILDDIR= postbuild
make[1]: Entering directory `/tmp/modconfig-tGleah/vmmon-only'
make[1]: `postbuild' is up to date.
make[1]: Leaving directory `/tmp/modconfig-tGleah/vmmon-only'
cp -f vmmon.ko ./../vmmon.o
make: Leaving directory `/tmp/modconfig-tGleah/vmmon-only'
Using 2.6.x kernel build system.
make: Entering directory `/tmp/modconfig-tGleah/vmnet-only'
/usr/bin/make -C /lib/modules/3.9.0-030900-generic/build/include/.. SUBDIRS=$PWD SRCROOT=$PWD/. \
      MODULEBUILDDIR= modules
make[1]: Entering directory `/usr/src/linux-headers-3.9.0-030900-generic'
  CC [M]  /tmp/modconfig-tGleah/vmnet-only/driver.o
  CC [M]  /tmp/modconfig-tGleah/vmnet-only/hub.o
  CC [M]  /tmp/modconfig-tGleah/vmnet-only/userif.o
  CC [M]  /tmp/modconfig-tGleah/vmnet-only/netif.o
  CC [M]  /tmp/modconfig-tGleah/vmnet-only/bridge.o
  CC [M]  /tmp/modconfig-tGleah/vmnet-only/filter.o
  CC [M]  /tmp/modconfig-tGleah/vmnet-only/procfs.o
  CC [M]  /tmp/modconfig-tGleah/vmnet-only/smac_compat.o
  CC [M]  /tmp/modconfig-tGleah/vmnet-only/smac.o
  CC [M]  /tmp/modconfig-tGleah/vmnet-only/vnetEvent.o
  CC [M]  /tmp/modconfig-tGleah/vmnet-only/vnetUserListener.o
  LD [M]  /tmp/modconfig-tGleah/vmnet-only/vmnet.o
  Building modules, stage 2.
  MODPOST 1 modules
  CC      /tmp/modconfig-tGleah/vmnet-only/vmnet.mod.o
  LD [M]  /tmp/modconfig-tGleah/vmnet-only/vmnet.ko
make[1]: Leaving directory `/usr/src/linux-headers-3.9.0-030900-generic'
/usr/bin/make -C $PWD SRCROOT=$PWD/. \
      MODULEBUILDDIR= postbuild
make[1]: Entering directory `/tmp/modconfig-tGleah/vmnet-only'
make[1]: `postbuild' is up to date.
make[1]: Leaving directory `/tmp/modconfig-tGleah/vmnet-only'
cp -f vmnet.ko ./../vmnet.o
make: Leaving directory `/tmp/modconfig-tGleah/vmnet-only'
Using 2.6.x kernel build system.
make: Entering directory `/tmp/modconfig-tGleah/vmblock-only'
/usr/bin/make -C /lib/modules/3.9.0-030900-generic/build/include/.. SUBDIRS=$PWD SRCROOT=$PWD/. \
      MODULEBUILDDIR= modules
make[1]: Entering directory `/usr/src/linux-headers-3.9.0-030900-generic'
  CC [M]  /tmp/modconfig-tGleah/vmblock-only/linux/block.o
  CC [M]  /tmp/modconfig-tGleah/vmblock-only/linux/control.o
  CC [M]  /tmp/modconfig-tGleah/vmblock-only/linux/dentry.o
  CC [M]  /tmp/modconfig-tGleah/vmblock-only/linux/file.o
  CC [M]  /tmp/modconfig-tGleah/vmblock-only/linux/filesystem.o
  CC [M]  /tmp/modconfig-tGleah/vmblock-only/linux/inode.o
  CC [M]  /tmp/modconfig-tGleah/vmblock-only/linux/module.o
  CC [M]  /tmp/modconfig-tGleah/vmblock-only/linux/stubs.o
/tmp/modconfig-tGleah/vmblock-only/linux/dentry.c:38:4: warning: initialisation from incompatible pointer type [enabled by default]
/tmp/modconfig-tGleah/vmblock-only/linux/dentry.c:38:4: warning: (near initialisation for ‘LinkDentryOps.d_revalidate’) [enabled by default]
/tmp/modconfig-tGleah/vmblock-only/linux/dentry.c: In function ‘DentryOpRevalidate’:
/tmp/modconfig-tGleah/vmblock-only/linux/dentry.c:104:7: warning: passing argument 2 of ‘actualDentry->d_op->d_revalidate’ makes integer from pointer without a cast [enabled by default]
/tmp/modconfig-tGleah/vmblock-only/linux/dentry.c:104:7: note: expected ‘unsigned int’ but argument is of type ‘struct nameidata *’
  CC [M]  /tmp/modconfig-tGleah/vmblock-only/linux/super.o
/tmp/modconfig-tGleah/vmblock-only/linux/control.c: In function ‘ExecuteBlockOp’:
/tmp/modconfig-tGleah/vmblock-only/linux/control.c:285:9: warning: assignment from incompatible pointer type [enabled by default]
/tmp/modconfig-tGleah/vmblock-only/linux/control.c:296:4: warning: passing argument 1 of ‘putname’ from incompatible pointer type [enabled by default]
In file included from include/linux/proc_fs.h:5:0,
                 from /tmp/modconfig-tGleah/vmblock-only/linux/control.c:28:
include/linux/fs.h:2040:13: note: expected ‘struct filename *’ but argument is of type ‘char *’
/tmp/modconfig-tGleah/vmblock-only/linux/inode.c:49:4: warning: initialisation from incompatible pointer type [enabled by default]
/tmp/modconfig-tGleah/vmblock-only/linux/inode.c:49:4: warning: (near initialisation for ‘RootInodeOps.lookup’) [enabled by default]
  LD [M]  /tmp/modconfig-tGleah/vmblock-only/vmblock.o
  Building modules, stage 2.
  MODPOST 1 modules
WARNING: "putname" [/tmp/modconfig-tGleah/vmblock-only/vmblock.ko] undefined!
  CC      /tmp/modconfig-tGleah/vmblock-only/vmblock.mod.o
  LD [M]  /tmp/modconfig-tGleah/vmblock-only/vmblock.ko
make[1]: Leaving directory `/usr/src/linux-headers-3.9.0-030900-generic'
/usr/bin/make -C $PWD SRCROOT=$PWD/. \
      MODULEBUILDDIR= postbuild
make[1]: Entering directory `/tmp/modconfig-tGleah/vmblock-only'
make[1]: `postbuild' is up to date.
make[1]: Leaving directory `/tmp/modconfig-tGleah/vmblock-only'
cp -f vmblock.ko ./../vmblock.o
make: Leaving directory `/tmp/modconfig-tGleah/vmblock-only'
Using 2.6.x kernel build system.
make: Entering directory `/tmp/modconfig-tGleah/vmci-only'
/usr/bin/make -C /lib/modules/3.9.0-030900-generic/build/include/.. SUBDIRS=$PWD SRCROOT=$PWD/. \
      MODULEBUILDDIR= modules
make[1]: Entering directory `/usr/src/linux-headers-3.9.0-030900-generic'
  CC [M]  /tmp/modconfig-tGleah/vmci-only/linux/driver.o
  CC [M]  /tmp/modconfig-tGleah/vmci-only/linux/vmciKernelIf.o
  CC [M]  /tmp/modconfig-tGleah/vmci-only/common/vmciContext.o
  CC [M]  /tmp/modconfig-tGleah/vmci-only/common/vmciDoorbell.o
  CC [M]  /tmp/modconfig-tGleah/vmci-only/common/vmciDriver.o
  CC [M]  /tmp/modconfig-tGleah/vmci-only/common/vmciDatagram.o
  CC [M]  /tmp/modconfig-tGleah/vmci-only/common/vmciEvent.o
  CC [M]  /tmp/modconfig-tGleah/vmci-only/common/vmciHashtable.o
/tmp/modconfig-tGleah/vmci-only/linux/driver.c:127:4: error: implicit declaration of function ‘__devexit_p’ [-Werror=implicit-function-declaration]
/tmp/modconfig-tGleah/vmci-only/linux/driver.c:127:4: error: initialiser element is not constant
/tmp/modconfig-tGleah/vmci-only/linux/driver.c:127:4: error: (near initialisation for ‘vmci_driver.remove’)
/tmp/modconfig-tGleah/vmci-only/linux/driver.c:1754:1: error: expected ‘=’, ‘,’, ‘;’, ‘asm’ or ‘__attribute__’ before ‘vmci_probe_device’
/tmp/modconfig-tGleah/vmci-only/linux/driver.c:1982:1: error: expected ‘=’, ‘,’, ‘;’, ‘asm’ or ‘__attribute__’ before ‘vmci_remove_device’
/tmp/modconfig-tGleah/vmci-only/linux/driver.c:119:12: warning: ‘vmci_probe_device’ used but never defined [enabled by default]
/tmp/modconfig-tGleah/vmci-only/linux/driver.c:121:13: warning: ‘vmci_remove_device’ used but never defined [enabled by default]
/tmp/modconfig-tGleah/vmci-only/linux/driver.c:2063:1: warning: ‘vmci_interrupt’ defined but not used [-Wunused-function]
/tmp/modconfig-tGleah/vmci-only/linux/driver.c:2137:1: warning: ‘vmci_interrupt_bm’ defined but not used [-Wunused-function]
/tmp/modconfig-tGleah/vmci-only/linux/driver.c:1717:1: warning: ‘vmci_enable_msix’ defined but not used [-Wunused-function]
cc1: some warnings being treated as errors
make[2]: *** [/tmp/modconfig-tGleah/vmci-only/linux/driver.o] Error 1
make[2]: *** Waiting for unfinished jobs....
make[1]: *** [_module_/tmp/modconfig-tGleah/vmci-only] Error 2
make[1]: Leaving directory `/usr/src/linux-headers-3.9.0-030900-generic'
make: *** [vmci.ko] Error 2
make: Leaving directory `/tmp/modconfig-tGleah/vmci-only'
Unable to install all modules.  See log for details.

pst007x@pst007x-Serval-Professional:~/Desktop$ 


Tried as suggested below, but same issue:

pst007x@pst007x-Serval-Professional:~$ sudo vmware-modconfig --console --install-all
[sudo] password for pst007x: 
Stopping VMware services:
   VMware Authentication Daemon                                        done
   VM communication interface socket family                            done
   Virtual machine communication interface                             done
   Virtual machine monitor                                             done
   Blocking file system                                                done
Using 2.6.x kernel build system.
make: Entering directory `/tmp/modconfig-IFjtiM/vmmon-only'
/usr/bin/make -C /lib/modules/3.9.0-030900-generic/build/include/.. SUBDIRS=$PWD SRCROOT=$PWD/. \
      MODULEBUILDDIR= modules
make[1]: Entering directory `/usr/src/linux-headers-3.9.0-030900-generic'
  CC [M]  /tmp/modconfig-IFjtiM/vmmon-only/linux/driver.o
  CC [M]  /tmp/modconfig-IFjtiM/vmmon-only/linux/driverLog.o
  CC [M]  /tmp/modconfig-IFjtiM/vmmon-only/linux/hostif.o
  CC [M]  /tmp/modconfig-IFjtiM/vmmon-only/common/apic.o
  CC [M]  /tmp/modconfig-IFjtiM/vmmon-only/common/comport.o
  CC [M]  /tmp/modconfig-IFjtiM/vmmon-only/common/cpuid.o
  CC [M]  /tmp/modconfig-IFjtiM/vmmon-only/common/hashFunc.o
  CC [M]  /tmp/modconfig-IFjtiM/vmmon-only/common/memtrack.o
  CC [M]  /tmp/modconfig-IFjtiM/vmmon-only/common/phystrack.o
  CC [M]  /tmp/modconfig-IFjtiM/vmmon-only/common/task.o
  CC [M]  /tmp/modconfig-IFjtiM/vmmon-only/common/vmx86.o
  CC [M]  /tmp/modconfig-IFjtiM/vmmon-only/vmcore/moduleloop.o
  LD [M]  /tmp/modconfig-IFjtiM/vmmon-only/vmmon.o
  Building modules, stage 2.
  MODPOST 1 modules
  CC      /tmp/modconfig-IFjtiM/vmmon-only/vmmon.mod.o
  LD [M]  /tmp/modconfig-IFjtiM/vmmon-only/vmmon.ko
make[1]: Leaving directory `/usr/src/linux-headers-3.9.0-030900-generic'
/usr/bin/make -C $PWD SRCROOT=$PWD/. \
      MODULEBUILDDIR= postbuild
make[1]: Entering directory `/tmp/modconfig-IFjtiM/vmmon-only'
make[1]: `postbuild' is up to date.
make[1]: Leaving directory `/tmp/modconfig-IFjtiM/vmmon-only'
cp -f vmmon.ko ./../vmmon.o
make: Leaving directory `/tmp/modconfig-IFjtiM/vmmon-only'
Using 2.6.x kernel build system.
make: Entering directory `/tmp/modconfig-IFjtiM/vmnet-only'
/usr/bin/make -C /lib/modules/3.9.0-030900-generic/build/include/.. SUBDIRS=$PWD SRCROOT=$PWD/. \
      MODULEBUILDDIR= modules
make[1]: Entering directory `/usr/src/linux-headers-3.9.0-030900-generic'
  CC [M]  /tmp/modconfig-IFjtiM/vmnet-only/driver.o
  CC [M]  /tmp/modconfig-IFjtiM/vmnet-only/hub.o
  CC [M]  /tmp/modconfig-IFjtiM/vmnet-only/userif.o
  CC [M]  /tmp/modconfig-IFjtiM/vmnet-only/netif.o
  CC [M]  /tmp/modconfig-IFjtiM/vmnet-only/bridge.o
  CC [M]  /tmp/modconfig-IFjtiM/vmnet-only/filter.o
  CC [M]  /tmp/modconfig-IFjtiM/vmnet-only/procfs.o
  CC [M]  /tmp/modconfig-IFjtiM/vmnet-only/smac_compat.o
  CC [M]  /tmp/modconfig-IFjtiM/vmnet-only/smac.o
  CC [M]  /tmp/modconfig-IFjtiM/vmnet-only/vnetEvent.o
  CC [M]  /tmp/modconfig-IFjtiM/vmnet-only/vnetUserListener.o
  LD [M]  /tmp/modconfig-IFjtiM/vmnet-only/vmnet.o
  Building modules, stage 2.
  MODPOST 1 modules
  CC      /tmp/modconfig-IFjtiM/vmnet-only/vmnet.mod.o
  LD [M]  /tmp/modconfig-IFjtiM/vmnet-only/vmnet.ko
make[1]: Leaving directory `/usr/src/linux-headers-3.9.0-030900-generic'
/usr/bin/make -C $PWD SRCROOT=$PWD/. \
      MODULEBUILDDIR= postbuild
make[1]: Entering directory `/tmp/modconfig-IFjtiM/vmnet-only'
make[1]: `postbuild' is up to date.
make[1]: Leaving directory `/tmp/modconfig-IFjtiM/vmnet-only'
cp -f vmnet.ko ./../vmnet.o
make: Leaving directory `/tmp/modconfig-IFjtiM/vmnet-only'
Using 2.6.x kernel build system.
make: Entering directory `/tmp/modconfig-IFjtiM/vmblock-only'
/usr/bin/make -C /lib/modules/3.9.0-030900-generic/build/include/.. SUBDIRS=$PWD SRCROOT=$PWD/. \
      MODULEBUILDDIR= modules
make[1]: Entering directory `/usr/src/linux-headers-3.9.0-030900-generic'
  CC [M]  /tmp/modconfig-IFjtiM/vmblock-only/linux/block.o
  CC [M]  /tmp/modconfig-IFjtiM/vmblock-only/linux/control.o
  CC [M]  /tmp/modconfig-IFjtiM/vmblock-only/linux/dentry.o
  CC [M]  /tmp/modconfig-IFjtiM/vmblock-only/linux/file.o
  CC [M]  /tmp/modconfig-IFjtiM/vmblock-only/linux/filesystem.o
  CC [M]  /tmp/modconfig-IFjtiM/vmblock-only/linux/inode.o
  CC [M]  /tmp/modconfig-IFjtiM/vmblock-only/linux/module.o
  CC [M]  /tmp/modconfig-IFjtiM/vmblock-only/linux/stubs.o
/tmp/modconfig-IFjtiM/vmblock-only/linux/control.c: In function ‘ExecuteBlockOp’:
/tmp/modconfig-IFjtiM/vmblock-only/linux/control.c:285:9: warning: assignment from incompatible pointer type [enabled by default]
/tmp/modconfig-IFjtiM/vmblock-only/linux/control.c:296:4: warning: passing argument 1 of ‘putname’ from incompatible pointer type [enabled by default]
In file included from include/linux/proc_fs.h:5:0,
                 from /tmp/modconfig-IFjtiM/vmblock-only/linux/control.c:28:
include/linux/fs.h:2040:13: note: expected ‘struct filename *’ but argument is of type ‘char *’
/tmp/modconfig-IFjtiM/vmblock-only/linux/dentry.c:38:4: warning: initialisation from incompatible pointer type [enabled by default]
/tmp/modconfig-IFjtiM/vmblock-only/linux/dentry.c:38:4: warning: (near initialisation for ‘LinkDentryOps.d_revalidate’) [enabled by default]
/tmp/modconfig-IFjtiM/vmblock-only/linux/dentry.c: In function ‘DentryOpRevalidate’:
/tmp/modconfig-IFjtiM/vmblock-only/linux/dentry.c:104:7: warning: passing argument 2 of ‘actualDentry->d_op->d_revalidate’ makes integer from pointer without a cast [enabled by default]
/tmp/modconfig-IFjtiM/vmblock-only/linux/dentry.c:104:7: note: expected ‘unsigned int’ but argument is of type ‘struct nameidata *’
/tmp/modconfig-IFjtiM/vmblock-only/linux/inode.c:49:4: warning: initialisation from incompatible pointer type [enabled by default]
/tmp/modconfig-IFjtiM/vmblock-only/linux/inode.c:49:4: warning: (near initialisation for ‘RootInodeOps.lookup’) [enabled by default]
  CC [M]  /tmp/modconfig-IFjtiM/vmblock-only/linux/super.o
  LD [M]  /tmp/modconfig-IFjtiM/vmblock-only/vmblock.o
  Building modules, stage 2.
  MODPOST 1 modules
WARNING: "putname" [/tmp/modconfig-IFjtiM/vmblock-only/vmblock.ko] undefined!
  CC      /tmp/modconfig-IFjtiM/vmblock-only/vmblock.mod.o
  LD [M]  /tmp/modconfig-IFjtiM/vmblock-only/vmblock.ko
make[1]: Leaving directory `/usr/src/linux-headers-3.9.0-030900-generic'
/usr/bin/make -C $PWD SRCROOT=$PWD/. \
      MODULEBUILDDIR= postbuild
make[1]: Entering directory `/tmp/modconfig-IFjtiM/vmblock-only'
make[1]: `postbuild' is up to date.
make[1]: Leaving directory `/tmp/modconfig-IFjtiM/vmblock-only'
cp -f vmblock.ko ./../vmblock.o
make: Leaving directory `/tmp/modconfig-IFjtiM/vmblock-only'
Using 2.6.x kernel build system.

make: Entering directory `/tmp/modconfig-IFjtiM/vmci-only'
/usr/bin/make -C /lib/modules/3.9.0-030900-generic/build/include/.. SUBDIRS=$PWD SRCROOT=$PWD/. \
      MODULEBUILDDIR= modules
make[1]: Entering directory `/usr/src/linux-headers-3.9.0-030900-generic'
  CC [M]  /tmp/modconfig-IFjtiM/vmci-only/linux/driver.o
  CC [M]  /tmp/modconfig-IFjtiM/vmci-only/linux/vmciKernelIf.o
  CC [M]  /tmp/modconfig-IFjtiM/vmci-only/common/vmciContext.o
  CC [M]  /tmp/modconfig-IFjtiM/vmci-only/common/vmciDatagram.o
  CC [M]  /tmp/modconfig-IFjtiM/vmci-only/common/vmciDoorbell.o
  CC [M]  /tmp/modconfig-IFjtiM/vmci-only/common/vmciDriver.o
  CC [M]  /tmp/modconfig-IFjtiM/vmci-only/common/vmciHashtable.o
  CC [M]  /tmp/modconfig-IFjtiM/vmci-only/common/vmciEvent.o
/tmp/modconfig-IFjtiM/vmci-only/linux/driver.c:127:4: error: implicit declaration of function ‘__devexit_p’ [-Werror=implicit-function-declaration]
/tmp/modconfig-IFjtiM/vmci-only/linux/driver.c:127:4: error: initialiser element is not constant
/tmp/modconfig-IFjtiM/vmci-only/linux/driver.c:127:4: error: (near initialisation for ‘vmci_driver.remove’)

/tmp/modconfig-IFjtiM/vmci-only/linux/driver.c:1754:1: error: expected ‘=’, ‘,’, ‘;’, ‘asm’ or ‘__attribute__’ before ‘vmci_probe_device’
/tmp/modconfig-IFjtiM/vmci-only/linux/driver.c:1982:1: error: expected ‘=’, ‘,’, ‘;’, ‘asm’ or ‘__attribute__’ before ‘vmci_remove_device’
/tmp/modconfig-IFjtiM/vmci-only/linux/driver.c:119:12: warning: ‘vmci_probe_device’ used but never defined [enabled by default]
/tmp/modconfig-IFjtiM/vmci-only/linux/driver.c:121:13: warning: ‘vmci_remove_device’ used but never defined [enabled by default]
/tmp/modconfig-IFjtiM/vmci-only/linux/driver.c:2063:1: warning: ‘vmci_interrupt’ defined but not used [-Wunused-function]
/tmp/modconfig-IFjtiM/vmci-only/linux/driver.c:2137:1: warning: ‘vmci_interrupt_bm’ defined but not used [-Wunused-function]
/tmp/modconfig-IFjtiM/vmci-only/linux/driver.c:1717:1: warning: ‘vmci_enable_msix’ defined but not used [-Wunused-function]
cc1: some warnings being treated as errors
make[2]: *** [/tmp/modconfig-IFjtiM/vmci-only/linux/driver.o] Error 1
make[2]: *** Waiting for unfinished jobs....
make[1]: *** [_module_/tmp/modconfig-IFjtiM/vmci-only] Error 2
make[1]: Leaving directory `/usr/src/linux-headers-3.9.0-030900-generic'
make: *** [vmci.ko] Error 2
make: Leaving directory `/tmp/modconfig-IFjtiM/vmci-only'
Unable to install all modules.  See log for details.


pst007x@pst007x-Serval-Professional:~$ sudo apt-get install build-essential
Reading package lists... Done
Building dependency tree       
Reading state information... Done
build-essential is already the newest version.
0 upgraded, 0 newly installed, 0 to remove and 1 not upgraded.
pst007x@pst007x-Serval-Professional:~$ 

Thursday, 4 April 2013

HOW TO Solve issue Nvidia & X.org Server Problems on Linux or BackTrack5


  1. I spent a week trying to resolve the error generated by X.org Server and Nvidia drivers, and I think I've finally solved.
    This is the solution for my Nvidia GT540M & Intel i7-2670QM (ASUS X53SV-SX598V)
    1. Download NVIDIA driver from here: http://www.nvidia.com/object/unix.html.
    I use Linux x86_64/AMD64/EM64T (NVIDIA-Linux-x86_64-285.05.09.run) for my system at 64bit
    2. Install system updates
    Code:
    sudo apt-get update && sudo apt-get upgrade
    3. Install linux-header to the upgraded kernel
    Code:
    sudo apt-get install linux-headers-$(uname -r)
    4. If dkms and build essential haven't been installed
    Code:
    sudo apt-get install dkms build-essential
    5. Open blacklist.conf file to add some lines (I use vi command)
    Code:
    vi /etc/modprobe.d/blacklist.conf
    6. Press i and after others “blacklist” list add this list
    Code:
    blacklist vga16fb
    blacklist nouveau
    blacklist rivafb
    blacklist nvidiafb
    blacklist rivatv
    7. After that, press ESC and type :wq (this write the file)
    8. Make grub.cfg writable
    Code:
    chmod +w /boot/grub/grub.cfg
    9. Open grub.cfg file
    Code:
    vi /boot/grub/grub.cfg
    10. Find text splash text inside the document and add nouveau.modeset=0 text like this
    Code:
    text splash nouveau.modeset=0 vga=791
    11. After that, press ESC and type :wq (this write the file)
    12. Disable writable mode to grub.cfg file
    Code:
    chmod -w /boot/grub/grub.cfg
    13. Update grub.cfg file
    Code:
    update-grub‎
    14. Reboot
    15. Login and don’t write startx
    16. Remove all previous Nvidia drivers
    Code:
    sudo apt-get --purge remove nvidia-*
    17. Remove default drivers
    Code:
    sudo apt-get --purge remove xserver-xorg-video-nouveau
    18. Chmod the nvidia driver file
    Code:
    chmod a+x NVIDIA-Linux-x86_64-285.05.09.run
    19. Run the nvidia driver*
    Code:
    sh ./NVIDIA-Linux-x86_64-285.05.09.run
    *If you use a 64bit system don’t install the OpenGL 32bit
    20. Reboot

    If you have a problem like this:
    Code:
     
    X.Org X Server 1.7.6
    Release Date: 2010-03-17
    X Protocol Version 11, Revision 0
    Build Operating System: Linux 2.6.24-28-server x86_64 Ubuntu
    [...]
    Fatal server error:
    no screens found

    It means that the automatic writing of xorg.conf (nvidia-xconfig command) during installation is not successful., but the driver has been installed correctly.
    To solve this problem just delete the xorg.conf file:

    Code:
    rm /etc/X11/xorg.conf
    When you restart the PC the file xorg.conf file will be created automatically.
    Reebot and type
    Code:
    startx
    I hope it helps

Friday, 29 March 2013

XAMPP: Another web server daemon with SSL is already running

This is a peculiar error you will get if you run XAMPP in LINUX.


Assumption: XAMPP is unzipped @ /opt/ folder.

If you get the error "XAMPP: Another web server daemon with SSL is already running" when you run "./lampp start". Simply follow the steps below to get rid of this error:

1. Open the file /opt/lampp/etc/httpd.conf
2. Search the "Listen 80" and change it to some other port (e.g. Listen 2145)  (Line No. 40)
3. Open the file /opt/lampp/etc/extra/httpd-ssl.conf
4. Search the "Listen 443" and change it to some other port (e.g. Listen 16443) (Line No. 39)
5. Open the file "/opt/lampp/lampp"
6. Search for the port "testport 80" and replace it to "testport 2145". Also change the "testport 443" to "testport 16443". (Happens to be the Line No. 197, 214)
7. Now go and run "/opt/lampp/lampp start". (It should work now).


Hope this Helps :-)

Wednesday, 23 January 2013

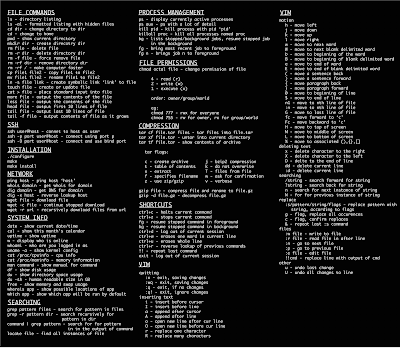
All You Need To Know About Linux Commands


System Info


date – Show the current date and time
cal – Show this month's calendar
uptime – Show current uptime
w – Display who is online
whoami – Who you are logged in as
finger user – Display information about user
uname -a – Show kernel information
cat /proc/cpuinfo – CPU information
cat /proc/meminfo – Memory information
df – Show disk usage
du – Show directory space usage
free – Show memory and swap usage

Keyboard Shortcuts

Enter – Run the command
Up Arrow – Show the previous command
Ctrl + R – Allows you to type a part of the command you're looking for and finds it
Ctrl + Z – Stops the current command, resume with fg in the foreground or bg in the background
Ctrl + C – Halts the current command, cancel the current operation and/or start with a fresh new line
Ctrl + L – Clear the screen

command | less – Allows the scrolling of the bash command window using Shift + Up Arrow and Shift + Down Arrow
!! – Repeats the last command
command  !$ – Repeats the last argument of the previous command
Esc + . (a period) – Insert the last argument of the previous command on the fly, which enables you to edit it before executing the command

Ctrl + A – Return to the start of the command you're typing
Ctrl + E – Go to the end of the command you're typing
Ctrl + U – Cut everything before the cursor to a special clipboard, erases the whole line
Ctrl + K – Cut everything after the cursor to a special clipboard
Ctrl + Y – Paste from the special clipboard that Ctrl + U and Ctrl + K save their data to
Ctrl + T – Swap the two characters before the cursor (you can actually use this to transport a character from the left to the right, try it!)
Ctrl + W – Delete the word / argument left of the cursor in the current line
Ctrl + D – Log out of current session, similar to exit

Learn the Commands

apropos subject – List manual pages for subject
man -k keyword – Display man pages containing keyword
man command – Show the manual for command
man -t man | ps2pdf - > man.pdf  – Make a pdf of a manual page
which command – Show full path name of command
time command – See how long a command takes

whereis app – Show possible locations of app
which app – Show which app will be run by default; it shows the full path

Searching

grep pattern files – Search for pattern in files
grep -r pattern dir – Search recursively for pattern in dir
command | grep pattern – Search for pattern in the output of command
locate file – Find all instances of file
find / -name filename – Starting with the root directory, look for the file called filename
find / -name ”*filename*” – Starting with the root directory, look for the file containing the string 

filename

locate filename – Find a file called filename using the locate command; this assumes you have already used the command updatedb (see next)
updatedb – Create or update the database of files on all file systems attached to the Linux root directory
which filename – Show the subdirectory containing the executable file  called filename
grep TextStringToFind /dir – Starting with the directory called dir, look for and list all files containing TextStringToFind

File Permissions

chmod octal file – Change the permissions of file to octal, which can be found separately for user, group, and world by adding: 4 – read (r), 2 – write (w), 1 – execute (x)
Examples:
chmod 777 – read, write, execute for all
chmod 755 – rwx for owner, rx for group and world
For more options, see man chmod.

File Commands

ls – Directory listing
ls -l – List files in current directory using long format
ls -laC – List all files in current directory in long format and display in columns
ls -F – List files in current directory and indicate the file type
ls -al – Formatted listing with hidden files
cd dir – Change directory to dir
cd – Change to home
mkdir dir – Create a directory dir
pwd – Show current directory

rm name – Remove a file or directory called name
rm -r dir – Delete directory dir
rm -f file – Force remove file
rm -rf dir – Force remove an entire directory dir and all it’s included files and subdirectories (use with extreme caution)

cp file1 file2 – Copy file1 to file2
cp -r dir1 dir2 – Copy dir1 to dir2; create dir2 if it doesn't exist
cp file /home/dirname – Copy the file called filename to the /home/dirname directory

mv file /home/dirname – Move the file called filename to the /home/dirname directory
mv file1 file2 – Rename or move file1 to file2; if file2 is an existing directory, moves file1 into directory file2

ln -s file link – Create symbolic link link to file
touch file – Create or update file
cat > file – Places standard input into file
cat file – Display the file called file

more file – Display the file called file one page at a time, proceed to next page using the spacebar
head file – Output the first 10 lines of file
head -20 file – Display the first 20 lines of the file called file
tail file – Output the last 10 lines of file
tail -20 file – Display the last 20 lines of the file called file
tail -f file – Output the contents of file as it grows, starting with the last 10 lines

Compression

tar cf file.tar files – Create a tar named file.tar containing files
tar xf file.tar – Extract the files from file.tar
tar czf file.tar.gz files – Create a tar with Gzip compression
tar xzf file.tar.gz – Extract a tar using Gzip
tar cjf file.tar.bz2 – Create a tar with Bzip2 compression
tar xjf file.tar.bz2 – Extract a tar using Bzip2
gzip file – Compresses file and renames it to file.gz
gzip -d file.gz – Decompresses file.gz back to file

Printing

/etc/rc.d/init.d/lpd start – Start the print daemon
/etc/rc.d/init.d/lpd stop – Stop the print daemon
/etc/rc.d/init.d/lpd status – Display status of the print daemon
lpq – Display jobs in print queue
lprm – Remove jobs from queue
lpr – Print a file
lpc – Printer control tool
man subject | lpr – Print the manual page called subject as plain text
man -t subject | lpr – Print the manual page called subject as Postscript output
printtool – Start X printer setup interface

Network

ifconfig – List IP addresses for all devices on the local machine
ping host – Ping host and output results
whois domain – Get whois information for domain
dig domain – Get DNS information for domain
dig -x host – Reverse lookup host
wget file – Download file
wget -c file – Continue a stopped download

SSH

ssh user@host – Connect to host as user
ssh -p port user@host – Connect to host on port port as user
ssh-copy-id user@host – Add your key to host for user to enable a keyed or passwordless login

User Administration

adduser accountname – Create a new user call accountname
passwd accountname – Give accountname a new password
su – Log in as superuser from current login
exit – Stop being superuser and revert to normal user

Process Management

ps – Display your currently active processes
top – Display all running processes
kill pid – Kill process id pid
killall proc – Kill all processes named proc (use with extreme caution)
bg – Lists stopped or background jobs; resume a stopped job in the background
fg – Brings the most recent job to foreground
fg n – Brings job n to the foreground

Installation from source

./configure
make
make install
dpkg -i pkg.deb – install a DEB package (Debian / Ubuntu / Linux Mint)
rpm -Uvh pkg.rpm – install a RPM package (Red Hat / Fedora)

Stopping & Starting

shutdown -h now – Shutdown the system now and do not reboot
halt – Stop all processes - same as above
shutdown -r 5 – Shutdown the system in 5 minutes and reboot
shutdown -r now – Shutdown the system now and reboot
reboot – Stop all processes and then reboot - same as above
startx – Start the X system


Recommended reading:

Cheat-Sheets.org – All cheat sheets, round-ups, quick reference cards, quick reference guides and quick reference sheets in one page. The only one you need.

Tutorial: The best tips & tricks for bash, explained – Linux Tutorial Blog / Quality Linux tutorials without clutter

LinuxCommand.org – Learning the shell, Writing shell scripts, Script library, SuperMan pages, Who, What, Where, Why

LinuxManPages.com – General commands, System calls, Subroutines, Special files, File formats, Games, Macros and conventions, Maintenence commands, Most Popular Man Pages

Linux Newbie Guide: Shorcuts and Commands - Linux essential shortcuts and sanity commands; Common Linux commands - system info; Basic operations, network apps, file (de)compression; Process control; Basic administration commands, accessing drives/partitions; Network administration tools, music-related commands, graphics-related commands.


Thursday, 13 December 2012

Using Virtual Ethernet Adapters in Promiscuous Mode on a Linux Host


VMware Workstation does not allow the virtual Ethernet adapter to go into promiscuous mode unless the user running VMware Workstation has permission to make that setting. This follows the standard Linux practice that only root can put a network interface into promiscuous mode.

When you install and configure VMware Workstation, you must run the installation as root. VMware Workstation creates the VMnet devices with root ownership and root group ownership, which means that only root has read and write permissions to the devices.

To set the virtual machine's Ethernet adapter to promiscuous mode, you must launch VMware Workstation as root because you must have read and write access to the VMnet device. For example, if you are using bridged networking, you must have access to /dev/vmnet0.

To grant selected other users read and write access to the VMnet device, you can create a new group, add the appropriate users to the group and grant that group read and write access to the appropriate device. You must make these changes on the host operating system as root (su -). For example, you can enter the following commands:

chgrp <newgroup> /dev/vmnet0

chmod g+rw /dev/vmnet0

<newgroup> is the group that should have the ability to set vmnet0 to promiscuous mode.
The command to run vmware workstations ads root is simple: user@user#:~$ sudo vmware start

If you want all users to be able to set the virtual Ethernet adapter (/dev/vmnet0 in our example) to promiscuous mode, run the following command on the host operating system as root:

chmod a+rw /dev/vmnet0


This is another posting showing "how to do computing" for everyday computer usages... For a general public

Monday, 12 November 2012

How to format USB drive using Linux terminal ..

How to format USB with Linux terminal ..  

[ Formatting a USB in Ubuntu or linux is as easy as make filesystem (mkfs).
mkfs and tab will show you all the filesystem types you can use:

[anc@localhost~]$ mkfs
mkfs mkfs.ext3 mkfs.jfs mkfs.ntfs mkfs.vfat
mkfs.cramfs mkfs.ext4 mkfs.minix mkfs.reiserfs mkfs.xfs
mkfs.ext2 mkfs.ext4dev mkfs.msdos mkfs.udffs


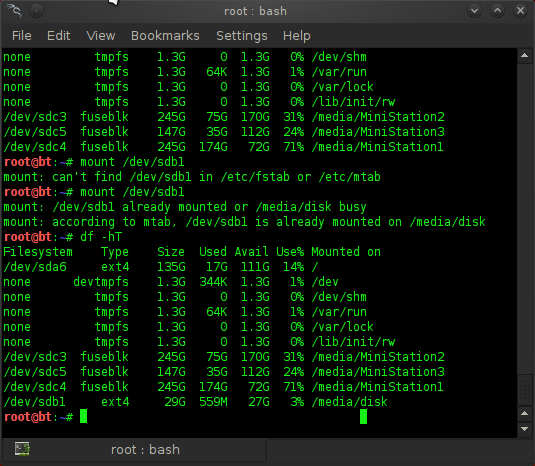
To format a USB drive all you need to know is its name, this can be found by
typing df at a terminal:

[anc@localhost~]$ df -hT
Filesystem Type Size Used Avail Use% Mounted on
--snip
/dev/sdc1 ext3 3.6G 3.3G 134M 97% /media/disk


In the above example my USB is sdc1 and is a 4G USB stick. As you can see
I changed it from NTFS to ext3.

FAT32 and NTFS are weak filesystems, not only are they prone to losing data but also
require constant defragging. Most linux filesystems (except ext2) are journalled. Thye never require defragging and have better security- the disadvantage is that if you format a USB memory stick as ext3 it cant be read under windows.

To answer your earlier question,

mkfs.vfat /dev/sdc1
mkfs.ntfs /dev/sdc1


would make FAT32 and NTFS filesystems on a memory stick called sdc1

Hope that helps. ]


[ This is another posting showing "how to do computing" for everyday computer usages... For a general public ]

Thursday, 30 August 2012

Learn how to build a desktop computer or PC

Learn how to build your own computer or PC.  Allows you to customize to meet your exact needs!  Sorry the quality is a little bit crappy.

Parts...
Cooler Master Elite 310 Case
Asus P5Q SE Plus motherboard
Intel Quad core Q8200 2.33 GHZ 4 MB cache 1333 MHZ FSB
Kingston PC8500 2 GB RAM 1066 MHZ
XFX GeForce 9800 GT 512MB GDDR3
Samsung 500 GB SATA HD 7200 RPM 16 MB buffer
Antec 500 W power supply
Samsung 22x SATA dual layer DVD burner
2x Antec 120mm ball bearing multiple speed fans

Music by:  incompetech.com
Song: Deliberate Thought
For use under Creative Commons license 3.0


How to check for open ports on Linux

Checking for open ports is among the first steps to secure your device. Listening services may be the entrance for attackers who may exploit...