Friday, 29 March 2013

XAMPP: Another web server daemon with SSL is already running

This is a peculiar error you will get if you run XAMPP in LINUX.


Assumption: XAMPP is unzipped @ /opt/ folder.

If you get the error "XAMPP: Another web server daemon with SSL is already running" when you run "./lampp start". Simply follow the steps below to get rid of this error:

1. Open the file /opt/lampp/etc/httpd.conf
2. Search the "Listen 80" and change it to some other port (e.g. Listen 2145)  (Line No. 40)
3. Open the file /opt/lampp/etc/extra/httpd-ssl.conf
4. Search the "Listen 443" and change it to some other port (e.g. Listen 16443) (Line No. 39)
5. Open the file "/opt/lampp/lampp"
6. Search for the port "testport 80" and replace it to "testport 2145". Also change the "testport 443" to "testport 16443". (Happens to be the Line No. 197, 214)
7. Now go and run "/opt/lampp/lampp start". (It should work now).


Hope this Helps :-)

Saturday, 23 March 2013

How to Setup Chroot Directory Structure ...


DebootstrapChroot


This article demonstrates a quick and easy way to create a chroot environment on an Ubuntu computer, which is like having a virtual system without the overhead of actual virtualization.
A chroot can be used for things like:
  • Running a 32-bit Firefox browser or a 32-bit Wine bottle on a 64-bit system.
  • Trying an older or newer Ubuntu release without reinstalling the operating system.
  • Trying a Debian release or other distribution derived from Debian.
  • Cross compiling and building packages for a different platform like Launchpad or Soyuz does it.

Example Configuration


In this example, we use a current Ubuntu 9.04 Jaunty system (the "host") to create a chroot for the older Ubuntu 8.04 Hardy release (the "target"). We are arbitrarily naming the new chroot environment hardy_i386 and putting it in the /srv/chroot directory on the host system.

Step 1: Install packages on the host computer.


First, install debootstrap, which is a utility that downloads and unpacks a basic Ubuntu system:

 $ sudo apt-get install debootstrap


Second, install schroot, which is a utility that wraps the regular chroot program and automatically manages chroot environments:

 $ sudo apt-get install schroot


Note: The debootstrap utility is usually backwards compatible with older releases, but it may be incompatible with newer releases. For example, the debootstrap that is bundled with Jaunty can prepare a Hardy chroot like we are doing here, but the debootstrap that is bundled with Hardy cannot prepare a Jaunty chroot.

If you have any difficultly with a debootstrap version mismatch, then visit http://packages.ubuntu.com/ to manually download and install the debootstrap package on the host system from the repository for the target release.

Step 2: Create a configuration file for schroot.


Choose a short name for the chroot, we use hardy_i386 in this example, and create a configuration file for it like this:

  sudo editor /etc/schroot/chroot.d/hardy_i386.conf


Note: In lucid the filename must not contain '.' , it should be lucid_i386_conf.
Put this in the new file:

  [hardy_i386]
  description=Ubuntu 8.04 Hardy for i386
  location=/srv/chroot/hardy_i386
  #personality=linux32
  root-users=bob
  run-setup-scripts=true
  run-exec-scripts=true
  type=directory
  users=alice,bob,charlie


Note: if you copy this example to your clipboard, be careful to start each line in column 1 before you save the new file! If you forget, the command schroot -l will fail with an error, e.g. 

E:/etc/schroot/chroot.d/hardy_i386.conf: line 0: Invalid line: “  [hardy_i386]”.

Note: for lucid use directory instead of location, e.g. directory=/srv/chroot/hardy_i386 .
Change these things in the example configuration file to fit your system:
  • location: This should be a directory that is outside of the /home tree. The latest schroot documentation recommends /srv/chroot.
  • personality: Enable this line if the host system is 64-bit running on an amd64/x64 computer and the chroot is 32-bit for i386. Otherwise, leave it disabled.
  • users: These are users on the host system that can invoke the schroot program and get access to the chroot system. Your username on the host system should be here.
  • root-users: These are users on the host system that can invoke the schroot program and get direct access to the chroot system as the root user.
Note: Do not put whitespace around the '=' character, and do not quote strings after the '=' character.

Step 3: Run debootstrap.


This will download and unpack a basic Ubuntu system to the chroot directory, similar to what the host system already has at the real root directory ("/").

 $ sudo mkdir -p /srv/chroot/hardy_i386
 $ sudo debootstrap --variant=buildd --arch=i386 hardy /srv/chroot/hardy_i386 http://archive.ubuntu.com/ubuntu/


This command should work for any distribution that is derived from Debian. Substitute the architecture "i386", the release name "hardy", and the repository address "http://archive.ubuntu.com/ubuntu/" appropriately. For example, do this to get the 64-bit build of Hardy instead of the 32-bit build:

  $ sudo debootstrap --arch=amd64 hardy /srv/chroot/hardy_amd64/ http://archive.ubuntu.com/ubuntu/


Note: Remember to change all instances of hardy_i386 to hardy_amd64 in the configuration file and on the command line if you actually do this.
Do something like this to get an upstream Debian release:

  $ sudo debootstrap --arch=amd64 sid /srv/chroot/sid_amd64/ http://ftp.debian.org/debian/


If trouble arises, debootsrap accepts a --verbose flag that may provide further insight.

Step 4: Check the chroot


This command lists configured chroots:tro
  $ schroot -l


If hardy_i386 appears in the list, then run:
  $ schroot -c hardy_i386 -u root


Note: This should work without using sudo to invoke the schroot program, and it should result in a root prompt in the chroot environment. Check that the root prompt is in a different system:

  # lsb_release -a


For the Hardy system that we just built, the lsb_release command should print:

No LSB modules are available.
Distributor ID: Ubuntu
Description:    Ubuntu 8.04
Release:        8.04
Codename:       hardy

We're done!

WARNING


For convenience, the default schroot configuration rebinds the /home directory on the host system so that it appears in the chroot system. This could be unexpected if you are familiar with the older dchroot program or the regular chroot program because it means that you can accidentally delete or otherwise damage things in /home on the host system.

To change this behavior run:
  $ sudo editor /etc/schroot/mount-defaults


And disable the /home line so that the file reads:

  # mount.defaults: static file system information for chroots.
  # Note that the mount point will be prefixed by the chroot path
  # (CHROOT_PATH)
  #
  # <file system> <mount point>   <type>  <options>       <dump>  <pass>
  proc            /proc           proc    defaults        0       0
  /dev/pts        /dev/pts        none    rw,bind         0       0
  tmpfs           /dev/shm        tmpfs   defaults        0       0
  #/home           /home           none    rw,bind         0       0
  /tmp            /tmp            none    rw,bind         0       0


The mount.defaults file is the /etc/fstab for chroot environments.

Hints


Install the ubuntu-minimal package in a new chroot after you create it:

  $ schroot -c hardy_i386 -u root
  # apt-get install ubuntu-minimal

If you get locale warnings in the chroot like "Locale not supported by C library." or "perl: warning: Setting locale failed." , then try one or more of these commands:

  $ sudo dpkg-reconfigure locales

  $ sudo apt-get install language-pack-en

  $ locale-gen en_US.UTF-8


If your preferred language is not English, then change "-en" and "en_US" appropriately.
As of Lucid, schroot has changed in these ways:
  • The file should be named: /etc/schroot/chroot.d/hardy-i386
  • The keywords in the file have changed and some have been deprecated. Additionally, keywords have to start at the beginning of the line. The file should read:
  [hardy-i386]
  description=Ubuntu 8.04 Hardy for i386
  directory=/srv/chroot/hardy-i386
  #personality=linux32
  root-users=bob
  type=directory
  users=alice,bob,charlie


As of Maverick schroot has further changed in these ways:
  • The configuration file should be stored in /etc/schroot/

TLDR


There's a much simplier way to get a basic chroot environment from an ISO image; if the text above seems TLDR, try this.

First of all, install Ubuntu Customization Kit:

  $ sudo apt-get install uck


Then set the directory in which you want to create the chroot environment:
  $ export BASEDIR=/path/to/chroot/directory/


Unpack the ISO image (this may take quite some time):
  $ sudo uck-remaster-unpack-iso /path/to/your/image.iso "$BASEDIR" && sudo uck-remaster-unpack-rootfs "$BASEDIR" && sudo uck-remaster-unpack-initrd "$BASEDIR"


You're done! Now, to enter the chroot environment, just execute
  $ sudo uck-remaster-chroot-rootfs /path/to/chroot/directory/


every time you wish to enter the chroot console. To leave it, type "exit".
To be able to run X applications, e.g. gedit, run

  # HOME=/root


in the chroot environment. 

Thursday, 21 March 2013

How to Disable Guest Account Login on Ubuntu


By default ubuntu 12.04 comes with guest account.You can disable this account using the following procedure.Guest account is a paswordless account which allow users to get access to Ubuntu machine


Open /etc/lightdm/lightdm.conf file from your terminal using the following command
gksudo gedit /etc/lightdm/lightdm.conf
Add the following line
allow-guest=false
Save and exit the file
After adding the above line you should see similar to the following in lightdm.conf file
[SeatDefaults]
user-session=ubuntu
greeter-session=unity-greeter
allow-guest=false
Finally you have to restart lightdm using the following command from your terminal
sudo restart lightdm
Note:- After executing above command all graphical programs running will be close

Thursday, 14 February 2013

How to Recover an Encrypted Home Directory on Ubuntu


While the home-folder encryption in Ubuntu is far from a perfect solution (there is considerable data leakage from the swap file and the temp directory - for example once I've observed the flash videos from Chromium porn private browsing mode being present in the /tmp directory), it is a partial solution nevertheless and very easy to set up during installation. However what can you do if you need to recover the data because you dismantled your system?

Credit where credit is due: this guide is taken mostly from the Ubuntu wiki page. Also, this is not an easy "one-click" process. You should proceed carefully, especially if you don't have much experience with the command line.

Start Ubuntu (from a separate install, from the LiveCD, etc) and mount the source filesystem (this is usually as simple as going to the Places menu and selecting the partition). Start a terminal (Alt+F2 -> gnome-terminal) and navigate to the partitions home directory. Usually this will look like the following:

cd /media/9e6325c9-1140-44b7-9d8e-614599b27e05/home/

Now navigate to the users ecryptfs directory (things to note: it is ecryptfs not encryptfs and your username does not coincide with your full name - the one you click on when you log in)

cd .ecryptfs/username

The next step is to recovery your "mount password" which is different from the password you use to log in (when it asks you, type in the login password used for this account - for which you are trying to recover the data). Take note of the returned password (you can copy it by selecting it and pressing Shift+Ctrl+C if you are using the Gnome Terminal)

ecryptfs-unwrap-passphrase .ecryptfs/wrapped-passphrase

Now create a directory where you would like to mount the decrypted home directory:

sudo mkdir /media/decrypted

Execute the following and type in (or better - copy-paste) the mount password you've recovered earlier

sudo ecryptfs-add-passphrase --fnek

It will return something like the following. Take note of the second key (auth tok):

Inserted auth tok with sig [9986ad986f986af7] into the user session keyring 
Inserted auth tok with sig [76a9f69af69a86fa] into the user session keyring

Now you are ready to mount the directry:

sudo mount -t ecryptfs /media/9e6325c9-1140-44b7-9d8e-614599b27e05/home/.ecryptfs/username/.Private /media/decrypted
 Passphrase:  # mount passphrase
 Selection: aes
 Selection: 16
 Enable plaintext passthrough: n 
 Enable filename encryption: y # this is not the default!
 Filename Encryption Key (FNEK) Signature: # the second key (auth tok) noted

You will probably get a warning about this key not being seen before (you can type yes) and asking if it should be added to your key cache (you should type no, since you won't be using it again probably).

That's it, now (assuming everything went right) you can access your decrypted folder in /media/decrypted. The biggest gotcha is that home/username/.Private is in fact a symlink, which - if you have an other partition mounted - will point you to the wrong directory, so you should use the home/.ecryptfs/username directory directly... If this does work you try this from this ubuntu tutorial ...

Or you can also try this Live CD method of opening a encrypted home directory

Monday, 28 January 2013

How to remove icons from Top-Taskbar on Gnome


You are using the Gnome-Classic interface - either you are using this by choice, or you are using the fallback  mode which occurs if your graphics card & driver doesnt the 3D Acceleration required for the full Gnome-Shell GUI.
To add and remove application launchers in the gnome-panel you need to:


Press Win+Alt and right-click the top menu bar - N.B. Win is the Windows Symbol key
If you are not using Compiz then you need to :
Press Alt and right-click the top menu bar


Much more information is described in the linked Q&A and other links in that answer.

Wednesday, 23 January 2013

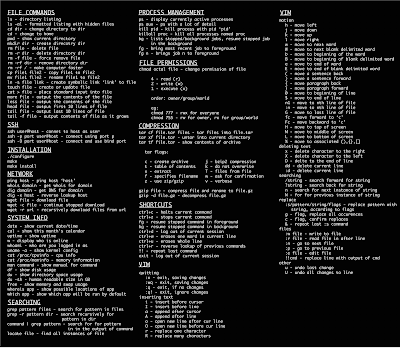
All You Need To Know About Linux Commands


System Info


date – Show the current date and time
cal – Show this month's calendar
uptime – Show current uptime
w – Display who is online
whoami – Who you are logged in as
finger user – Display information about user
uname -a – Show kernel information
cat /proc/cpuinfo – CPU information
cat /proc/meminfo – Memory information
df – Show disk usage
du – Show directory space usage
free – Show memory and swap usage

Keyboard Shortcuts

Enter – Run the command
Up Arrow – Show the previous command
Ctrl + R – Allows you to type a part of the command you're looking for and finds it
Ctrl + Z – Stops the current command, resume with fg in the foreground or bg in the background
Ctrl + C – Halts the current command, cancel the current operation and/or start with a fresh new line
Ctrl + L – Clear the screen

command | less – Allows the scrolling of the bash command window using Shift + Up Arrow and Shift + Down Arrow
!! – Repeats the last command
command  !$ – Repeats the last argument of the previous command
Esc + . (a period) – Insert the last argument of the previous command on the fly, which enables you to edit it before executing the command

Ctrl + A – Return to the start of the command you're typing
Ctrl + E – Go to the end of the command you're typing
Ctrl + U – Cut everything before the cursor to a special clipboard, erases the whole line
Ctrl + K – Cut everything after the cursor to a special clipboard
Ctrl + Y – Paste from the special clipboard that Ctrl + U and Ctrl + K save their data to
Ctrl + T – Swap the two characters before the cursor (you can actually use this to transport a character from the left to the right, try it!)
Ctrl + W – Delete the word / argument left of the cursor in the current line
Ctrl + D – Log out of current session, similar to exit

Learn the Commands

apropos subject – List manual pages for subject
man -k keyword – Display man pages containing keyword
man command – Show the manual for command
man -t man | ps2pdf - > man.pdf  – Make a pdf of a manual page
which command – Show full path name of command
time command – See how long a command takes

whereis app – Show possible locations of app
which app – Show which app will be run by default; it shows the full path

Searching

grep pattern files – Search for pattern in files
grep -r pattern dir – Search recursively for pattern in dir
command | grep pattern – Search for pattern in the output of command
locate file – Find all instances of file
find / -name filename – Starting with the root directory, look for the file called filename
find / -name ”*filename*” – Starting with the root directory, look for the file containing the string 

filename

locate filename – Find a file called filename using the locate command; this assumes you have already used the command updatedb (see next)
updatedb – Create or update the database of files on all file systems attached to the Linux root directory
which filename – Show the subdirectory containing the executable file  called filename
grep TextStringToFind /dir – Starting with the directory called dir, look for and list all files containing TextStringToFind

File Permissions

chmod octal file – Change the permissions of file to octal, which can be found separately for user, group, and world by adding: 4 – read (r), 2 – write (w), 1 – execute (x)
Examples:
chmod 777 – read, write, execute for all
chmod 755 – rwx for owner, rx for group and world
For more options, see man chmod.

File Commands

ls – Directory listing
ls -l – List files in current directory using long format
ls -laC – List all files in current directory in long format and display in columns
ls -F – List files in current directory and indicate the file type
ls -al – Formatted listing with hidden files
cd dir – Change directory to dir
cd – Change to home
mkdir dir – Create a directory dir
pwd – Show current directory

rm name – Remove a file or directory called name
rm -r dir – Delete directory dir
rm -f file – Force remove file
rm -rf dir – Force remove an entire directory dir and all it’s included files and subdirectories (use with extreme caution)

cp file1 file2 – Copy file1 to file2
cp -r dir1 dir2 – Copy dir1 to dir2; create dir2 if it doesn't exist
cp file /home/dirname – Copy the file called filename to the /home/dirname directory

mv file /home/dirname – Move the file called filename to the /home/dirname directory
mv file1 file2 – Rename or move file1 to file2; if file2 is an existing directory, moves file1 into directory file2

ln -s file link – Create symbolic link link to file
touch file – Create or update file
cat > file – Places standard input into file
cat file – Display the file called file

more file – Display the file called file one page at a time, proceed to next page using the spacebar
head file – Output the first 10 lines of file
head -20 file – Display the first 20 lines of the file called file
tail file – Output the last 10 lines of file
tail -20 file – Display the last 20 lines of the file called file
tail -f file – Output the contents of file as it grows, starting with the last 10 lines

Compression

tar cf file.tar files – Create a tar named file.tar containing files
tar xf file.tar – Extract the files from file.tar
tar czf file.tar.gz files – Create a tar with Gzip compression
tar xzf file.tar.gz – Extract a tar using Gzip
tar cjf file.tar.bz2 – Create a tar with Bzip2 compression
tar xjf file.tar.bz2 – Extract a tar using Bzip2
gzip file – Compresses file and renames it to file.gz
gzip -d file.gz – Decompresses file.gz back to file

Printing

/etc/rc.d/init.d/lpd start – Start the print daemon
/etc/rc.d/init.d/lpd stop – Stop the print daemon
/etc/rc.d/init.d/lpd status – Display status of the print daemon
lpq – Display jobs in print queue
lprm – Remove jobs from queue
lpr – Print a file
lpc – Printer control tool
man subject | lpr – Print the manual page called subject as plain text
man -t subject | lpr – Print the manual page called subject as Postscript output
printtool – Start X printer setup interface

Network

ifconfig – List IP addresses for all devices on the local machine
ping host – Ping host and output results
whois domain – Get whois information for domain
dig domain – Get DNS information for domain
dig -x host – Reverse lookup host
wget file – Download file
wget -c file – Continue a stopped download

SSH

ssh user@host – Connect to host as user
ssh -p port user@host – Connect to host on port port as user
ssh-copy-id user@host – Add your key to host for user to enable a keyed or passwordless login

User Administration

adduser accountname – Create a new user call accountname
passwd accountname – Give accountname a new password
su – Log in as superuser from current login
exit – Stop being superuser and revert to normal user

Process Management

ps – Display your currently active processes
top – Display all running processes
kill pid – Kill process id pid
killall proc – Kill all processes named proc (use with extreme caution)
bg – Lists stopped or background jobs; resume a stopped job in the background
fg – Brings the most recent job to foreground
fg n – Brings job n to the foreground

Installation from source

./configure
make
make install
dpkg -i pkg.deb – install a DEB package (Debian / Ubuntu / Linux Mint)
rpm -Uvh pkg.rpm – install a RPM package (Red Hat / Fedora)

Stopping & Starting

shutdown -h now – Shutdown the system now and do not reboot
halt – Stop all processes - same as above
shutdown -r 5 – Shutdown the system in 5 minutes and reboot
shutdown -r now – Shutdown the system now and reboot
reboot – Stop all processes and then reboot - same as above
startx – Start the X system


Recommended reading:

Cheat-Sheets.org – All cheat sheets, round-ups, quick reference cards, quick reference guides and quick reference sheets in one page. The only one you need.

Tutorial: The best tips & tricks for bash, explained – Linux Tutorial Blog / Quality Linux tutorials without clutter

LinuxCommand.org – Learning the shell, Writing shell scripts, Script library, SuperMan pages, Who, What, Where, Why

LinuxManPages.com – General commands, System calls, Subroutines, Special files, File formats, Games, Macros and conventions, Maintenence commands, Most Popular Man Pages

Linux Newbie Guide: Shorcuts and Commands - Linux essential shortcuts and sanity commands; Common Linux commands - system info; Basic operations, network apps, file (de)compression; Process control; Basic administration commands, accessing drives/partitions; Network administration tools, music-related commands, graphics-related commands.


How to check for open ports on Linux

Checking for open ports is among the first steps to secure your device. Listening services may be the entrance for attackers who may exploit...