Friday, 24 August 2018

Does RHEL 7 support online resize of disk partitions?

Environment

  • Red Hat Enterprise Linux 7

Issue

  • Both Xen and KVM support online resize of the virtual block devices that the virtual machines use.
  • Unfortunately, since the partitions in the boot virtual block device are already in use, those can't be modified online and the virtual machine won't pick up the changes on the boot virtual block device without a reboot.
  • We are looking for ability to dynamically increase a partitioned volume, is it possible to resize the disk partitions online in RHEL 7?
  • We are unable to dynamically increase a SAN attached volume without taking the volume offline. When will this feature to Support online resize of disk partitions be available?

Resolution

The ability to resize a Logical Volume and filesystem has long been provided by Logical Volume Manager (LVM) by simply using the entire block device (/dev/sdx for example) as a Physical Volume in the LVM Volume Group. There is no need for the old style of partition. This would allow the Logical Volume and filesystem to easily be expanded.
As to older style partitions, this feature has been added in RHEL 7 current release with a feature request (RFE has been filed to add support for online resize of disk partitions to RHEL 7 in private Red Hat Bugzilla 853105). With this feature, it's possible to resize the disk partitions online in RHEL 7.

Warning: Online partition table resizing is not a recommended process mostly because the underlying layer of an active logical volume or filesystem that relies on that information is being modified. While it is possible to perform online partition resize operation, it is not recommended simply from a data integrity standpoint and not because it's not possible.

  • In order to resize online a partition which is in use please observe the following steps:
# fdisk -l /dev/vda

Disk /dev/vda: 32.2 GB, 32212254720 bytes, 62914560 sectors
Units = sectors of 1 * 512 = 512 bytes
Sector size (logical/physical): 512 bytes / 512 bytes
I/O size (minimum/optimal): 512 bytes / 512 bytes
Disk label type: dos
Disk identifier: 0x000db7e6

   Device Boot      Start         End      Blocks   Id  System
/dev/vda1   *        2048     1026047      512000   83  Linux
/dev/vda2         1026048    28289023    13631488   8e  Linux LVM

# cat /proc/partitions 
major minor  #blocks  name

 252        0   31457280 vda
 252        1     512000 vda1
 252        2   13631488 vda2
  11        0    1048575 sr0
 253        0   10240000 dm-0
 253        1    2129920 dm-1

# pvs
  PV         VG          Fmt  Attr PSize  PFree
  /dev/vda2  rhel_vm-205 lvm2 a--  13.00g 1.20g
  • Modify the on-disk partition table as usual (e.g. by using fdisk command).
    • Delete the partition:
      Command (m for help): d
      Partition number (1,2, default 2): 2
      Partition 2 is deleted
      
    • Re-create the partition with the new size:
      Command (m for help): n
      Partition type:
         p   primary (1 primary, 0 extended, 3 free)
         e   extended
      Select (default p): p
      Partition number (2-4, default 2): 2
      First sector (1026048-62914559, default 1026048): 
      Using default value 1026048
      Last sector, +sectors or +size{K,M,G} (1026048-62914559, default 62914559): +18G
      Partition 2 of type Linux and of size 18 GiB is set
      
      Command (m for help): t
      Partition number (1,2, default 2): 2
      Hex code (type L to list all codes): 8e
      Changed type of partition 'Linux' to 'Linux LVM'
      
      Command (m for help): p
      
      Disk /dev/vda: 32.2 GB, 32212254720 bytes, 62914560 sectors
      Units = sectors of 1 * 512 = 512 bytes
      Sector size (logical/physical): 512 bytes / 512 bytes
      I/O size (minimum/optimal): 512 bytes / 512 bytes
      Disk label type: dos
      Disk identifier: 0x000db7e6
      
         Device Boot      Start         End      Blocks   Id  System
      /dev/vda1   *        2048     1026047      512000   83  Linux
      /dev/vda2         1026048    38774783    18874368   8e  Linux LVM
      
    • Commit changes to on-disk partition table:
      Command (m for help): w
      The partition table has been altered!
      
      Calling ioctl() to re-read partition table.
      
      WARNING: Re-reading the partition table failed with error 16: Device or resource busy.
      The kernel still uses the old table. The new table will be used at
      the next reboot or after you run partprobe(8) or kpartx(8)
      Syncing disks.
      
    • While on-disk partition table has been updated, observe that on-memory kernel partition table has not:
      # partprobe 
      Error: Partition(s) 2 on /dev/vda have been written, but we have been unable to inform the kernel of the change, probably because it/they are in use.  As a result, the old partition(s) will remain in use.  You should reboot now before making further changes.
      
      # cat /proc/partitions | grep vd
       252        0   31457280 vda
       252        1     512000 vda1
       252        2   13631488 vda2
      
  • Execute partx (provided by util-linux package) with --update option on the block device to update the in-memory kernel partition table from the on-disk partition table:
    # partx -u /dev/vda
    
  • Verify that in-memory kernel partition table has been updated with the new size:
    # cat /proc/partitions | grep vd
     252        0   31457280 vda
     252        1     512000 vda1
     252        2   18874368 vda2
    
  • Proceed with any further steps, in this example by extending the PV on the partition:
    # pvresize /dev/vda2
      Physical volume "/dev/vda2" changed
      1 physical volume(s) resized / 0 physical volume(s) not resized
    
    # pvs
      PV         VG          Fmt  Attr PSize  PFree
      /dev/vda2  rhel_vm-205 lvm2 a--  18.00g 6.20g
    

Root Cause

  • Changes to allow online resizing of in-use partitions are required in both kernel and userland.
    • RHEL7 kernels include the required changes to BLKPG ioctl from block: add partition resize function to blkpg ioctl to support BLKPG_RESIZE_PARTITION operation.
    • RHEL7 util-linux package includes partx and resizepart binaries, currently the only userland commands that support BLKPG_RESIZE_PARTITION operation of BLKPG ioctl.

Friday, 29 September 2017

Working with PuppetLabs Using Vagrant


While working as DevOps Engineer one of the tools by definition that we use more, often is Puppet. Guess most people will think that you are 100% expert, which is not always the case. So, I need to create this post and track record of my own experiments with Puppet and (PuppetLabs + Vagrant)

You might as what is Vagrant ?
==> "Vagrant is an open-source software product for building and maintaining portable virtual software development environments, e.g. for VirtualBox, Hyper-V, Docker, VMware, and AWS. ... Vagrant simplifies the necessary software configuration management in order to increase development productivity. " read more here: https://www.vagrantup.com/intro/index.html

The initial indentation was to gain better understanding puppet file structure. So, I decided to use Puppetlabs for this ...


So, basically. I did create installed

  • Installed Vagrant
  • Used the Vagrant init command to pull the puppetlabs ubuntu VM
  • Which created a file "Vagrantfile"
  • created a dir puppetlabs


And then started the Setup, so here are the Logs ..

Tdls-Air:puppetlabs psalms91$ vagrant up
Bringing machine 'default' up with 'virtualbox' provider...
==> default: Box 'puppetlabs/ubuntu-16.04-32-puppet' could not be found. Attempting to find and install...
    default: Box Provider: virtualbox
    default: Box Version: 1.0.0
==> default: Loading metadata for box 'puppetlabs/ubuntu-16.04-32-puppet'
    default: URL: https://vagrantcloud.com/puppetlabs/ubuntu-16.04-32-puppet
==> default: Adding box 'puppetlabs/ubuntu-16.04-32-puppet' (v1.0.0) for provider: virtualbox
    default: Downloading: https://vagrantcloud.com/puppetlabs/boxes/ubuntu-16.04-32-puppet/versions/1.0.0/providers/virtualbox.box
==> default: Successfully added box 'puppetlabs/ubuntu-16.04-32-puppet' (v1.0.0) for 'virtualbox'!
==> default: Importing base box 'puppetlabs/ubuntu-16.04-32-puppet'...
==> default: Matching MAC address for NAT networking...
==> default: Checking if box 'puppetlabs/ubuntu-16.04-32-puppet' is up to date...
==> default: Setting the name of the VM: puppetlabs_default_1506687306250_65705
==> default: Clearing any previously set network interfaces...
==> default: Preparing network interfaces based on configuration...
    default: Adapter 1: nat
==> default: Forwarding ports...
    default: 22 (guest) => 2222 (host) (adapter 1)
==> default: Booting VM...
==> default: Waiting for machine to boot. This may take a few minutes...
    default: SSH address: 127.0.0.1:2222
    default: SSH username: vagrant
    default: SSH auth method: private key
    default:
    default: Vagrant insecure key detected. Vagrant will automatically replace
    default: this with a newly generated keypair for better security.
    default:
    default: Inserting generated public key within guest...
    default: Removing insecure key from the guest if it's present...
    default: Key inserted! Disconnecting and reconnecting using new SSH key...
==> default: Machine booted and ready!
==> default: Checking for guest additions in VM...
    default: The guest additions on this VM do not match the installed version of
    default: VirtualBox! In most cases this is fine, but in rare cases it can
    default: prevent things such as shared folders from working properly. If you see
    default: shared folder errors, please make sure the guest additions within the
    default: virtual machine match the version of VirtualBox you have installed on
    default: your host and reload your VM.
    default:
    default: Guest Additions Version: 5.0.20
    default: VirtualBox Version: 5.1
==> default: Mounting shared folders...
    default: /vagrant => /Users/psalms91/Vagrant_VM/puppetlabs
Tdls-Air:puppetlabs psalms91$

Tdls-Air:puppetlabs psalms91$ vagrant ssh

Welcome to Ubuntu 16.04 LTS (GNU/Linux 4.4.0-21-generic i686)

 * Documentation:  https://help.ubuntu.com/

vagrant@localhost:~$

After this I have my Puppet Labs VM running ... After this point was easy, I just needed to goo into the puppet installation dir and look into the dir structure.


done.. :-)

Sunday, 30 July 2017

How To Install qBittorrent 3.3.7 On Ubuntu 16.04, Ubuntu 15.10 And Ubuntu 14.04 Systems


The - qBittorrent is a torrent client, similar to ÂµTorrent, which was recently ported to the Linux systems. Among others, qBittorrent has built-in search engine for searching in the popular BitTorrent sites, has torrent queueing and prioritizing features, has IP Filtering options, provides a tool for creating torrents and bandwidth limitations.


The latest version available is qBittorrent 3.3.7, which has been released, bringing a few changes only:
  • FEATURE: Delete torrent+files with Shift+Delete
  • BUGFIX: Fix 6-hour speedplot point push rate
  • BUGFIX: Avoid spawning a new explorer.exe process when selecting “Open containing folder”
  • BUGFIX: Fix loading of new geoip db due to an artificial size limit
  • BUGFIX: Better error handling and logging with smtp communication
  • SEARCH: Remove KickassTorrents search engine
  • SEARCH: Remove BTDigg search engine
  • SEARCH: Update Torrentz search engine
For more information, see the full changelog.

Installation instructions:

There isn’t any official qBittorrent PPA or repository, but the community maintains one, so that the users can keep their qBittorrent up to date easily.
The below instructions should work on all the supported Ubuntu systems and derivatives: Ubuntu 16.04 Xenial Xerus, Ubuntu 15.10 Wily Werewolf, Ubuntu 14.04 Trusty Tahr, Linux Mint 17.3 Rosa, Linux Mint 17.2 Rafaela, Linux Mint 17.1 Rebecca, Pinguy OS 14.04, Elementary OS 0.3 Freya, Deepin 2014, Peppermint Five, LXLE 14.04, Linux Lite 2.
$ sudo add-apt-repository ppa:qbittorrent-team/qbittorrent-stable
$ sudo apt-get update
$ sudo apt-get install qbittorrent
If you want to remove qbittorrent, do:
$ sudo apt-get remove qbittorrent


Friday, 28 July 2017

Reset Your Forgotten Ubuntu Password in 2 Minutes or Less


If you’ve ever forgotten your password, you aren’t alone… it’s probably one of the most common tech support problems I’ve encountered over the years. Luckily if you are using Ubuntu they made it incredibly easy to reset your password.
image
All it takes is adjusting the boot parameters slightly and typing a command or two, but we’ll walk you through it.
Reset Your Ubuntu Password
Reboot your computer, and then as soon as you see the GRUB Loading screen, make sure to hit the ESC key so that you can get to the menu.
image
Root Shell – Easy Method
If you have the option, you can choose the “recovery mode” item on the menu, usually found right below your default kernel option.
image[3]
Then choose “Drop to root shell prompt” from this menu.
image[6]
This should give you a root shell prompt.
Alternate Root Shell Method
If you don’t have the recovery mode option, this is the alternate way to manually edit the grub options to allow for a root shell.
First you’ll want to make sure to choose the regular boot kernel that you use (typically just the default one), and then use the “e” key to choose to edit that boot option.
image
Now just hit the down arrow key over to the “kernel” option, and then use the “e” key to switch to edit mode for the kernel option.
image
You’ll first be presented with a screen that looks very similar to this one:
image
You’ll want to remove the “ro quiet splash” part with the backspace key, and then add this onto the end:
rw init=/bin/bash
image
Once you hit enter after adjusting the kernel line, you’ll need to use the B key to choose to boot with that option.
image
At this point the system should boot up very quickly to a command prompt.
Changing the Actual Password
You can use the following command to reset your password:
passwd <username>
For example my username being geek I used this command:
passwd geek
image
After changing your password, use the following commands to reboot your system. (The sync command makes sure to write out data to the disk before rebooting)
sync
reboot –f
I found that the –f parameter was necessary to get the reboot command to work for some reason. You could always hardware reset instead, but make sure to use the sync command first.
And now you should be able to login without any issues.

Friday, 12 May 2017

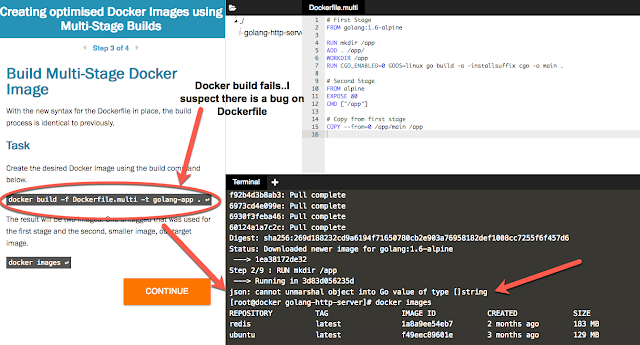
Error Faced while using KataCoda while Building Multiple dockers


Today I was doing some online training - Building and testing Multiple Dockers using Katacoda online platform. Ups, I guess I have not explained what Katacoda is ... Ok here is ....

Extracted from Wikipedia:  What is Katacoda ?? 
"A code kata is an exercise in programming which helps a programmer hone their skills through practice and repetition. The term was probably first coined by Dave Thomas, co-author of the book The Pragmatic Programmer,[1] in a bow to the Japanese concept of kata in the martial arts. As of October 2011, Dave Thomas has published 21 different katas.[2] "

While practicing some of the tasks in there I have notice docker build failing to build .. Did not resolved myself yet.. I guess I just wen to do a quick investigation and find out what was fundamentally causing the error.

Here is the errors I was getting;


Basically for some reason, I was getting a weird error while building the Go layer ..
So, looking into the dashboard and what I was seeing then, I then realised that the error was on the command to install the Go on the docker .. Did not actually resolved it .. I guess, I just keep a record of it in case of happen again ..


So, as you can see there is a bug on there .. I need to investigate, later on I will publish, what I found out.. My intention is to replicate the build locate and see if I can spot the same error ..

:-)
  

Tuesday, 26 July 2016

How to Create You Lab on Kali Linux - Using VMware or VBox

Before you start - Here are something that you need to consider..

  • Install VirtualBox or Vmware
  • Install LiveCD in VirtualBox or Vmware
  • Boot and try out your LiveCD

Introduction.


There are lots of tutorials available on the internet related to hacking but the big problem lies in testing your theoretical skills. Unless you don't have practical exposure to hacking, you cannot really understand the strength of it. The technique I will discuss here will be advantageous for those who have only single system and want to set up a testing network using it. In case you have multiple systems then you can easily test for your skills by making one system as target and other as attacker.
VMware Workstation 12 Pro - Leading Edge PC Virtualization VMware Workstation 12 Pro


Download VMware Workstation or Player

The best way to practice hacking is within a virtual environment. Essentially, you set up a hacking system, such as Kali Linux, and some victims to exploit. Ideally, you would want multiple operating systems (Windows XP, Vista, 7, and 8, as well as a Linux flavor) and applications so that you can try out a variety of hacks.

Virtual machines and a virtual network are the best and safest way to set up a hacking lab. There are several virtualization systems out there, including Citrix, Oracle's VirtualBox, KVM, Microsoft's Virtual PC and Hyper-V, and VMware'sWorkstation, VMware Player and ESXi. For a laboratory environment, I strongly recommend VMware's Workstation or Player. Workstation is commercial product that costs under $200, while Player is free. You can also get a free 30-day trial of Workstation.

Player is limited to just playing VMs , while Workstation can both create and play VMs. Let's download VMware's Workstation or Player here.


Then - For you Images you can download a pre-built image. As it will allow you to save some time, you don't need to build the image from scratch. Here is a link for you to download several Linux pre-built Linux Images on SourceForge.

I don't encourage you to download pre-built Windows VM from anywhere, for the single fact that Microsoft itself provides you with pre-built Windows VM for you to use on your VM Lab. Again I did the research for you and here it the link for you to download the Windows of your choice,  Obs: Remember Windows only allow you to use those VM images for 30 days. Please, READ Microsoft TERMS AND CONDITIONS before you use their software here is the url for you.


Keep posted - This tutorial continues on Part 2

Also check this Handful tutorials I have found online:

Checkout our tutorial videos below. Learn more about.
  1. OWASP AppSec Basics: http://www.youtube.com/watch?v=CDbWvEwBBxo
  2. OWASP SQL Injection: http://www.youtube.com/watch?v=pypTYPaU7mM
  3. OWASP Cross Site Scripting: http://www.youtube.com/watch?v=_Z9RQSnf8-g
  4. OWASP Strict Transport Security: http://www.youtube.com/watch?v=zEV3HOuM_Vw

How to Use Microsoft Ready-Made VM Images for VMware and VBox

Microsoft Officially Offering Ready-Made VirtualBox And VMWare Images

Microsoft Offering ready made pre-installed windows operating system to test Internet Explorer  , virtual machine images are available for windows ,mac and linux virtualization solutions , for cross browser testing , so you can test your site in different operating systems .
IE versions being offered are:
  • IE7 on Vista
  • IE8 on Windows 7
  • IE9 on Windows 7
  • IE10 on Windows 8
Offered  VMs that will run on:
  • Windows
  • OSX
  • Linux
The VM software choices are specific to the OS you choose:
  • Windows – Hyper-V, Virtual PC, VirtualBox & VMWare Player
  • OSX- VirtualBox & VMWare Fusion
  • Linux – VirtualBox
Cross-browser testing  simplified
Cross-browser testing
simplified
You have to just download and open vbox files with virtualbox or vmx files with vmware and you will get all pre-installed windows operating system , and you are good to go ,
there is pre-installed windows 8 virtual image if you want to test drive windows 8 🙂
How to Install virtual images :
  1. Download Virtual Images
  2. extract it somehwhere
  3. open vmware player or workstation
  4. click on file >> open
  5. locate  ” somefile”.vmx
  6. it will load up virtual image component

How to check for open ports on Linux

Checking for open ports is among the first steps to secure your device. Listening services may be the entrance for attackers who may exploit...