#get root access$su -$ cd /tmp#Remove old Ruby$ yum remove ruby# Install dependencies$ yum groupinstall "Development Tools"$ yum install zlib zlib-devel$ yum install openssl-devel$ wget http://pyyaml.org/download/libyaml/yaml-0.1.4.tar.gz$ tar xzvf yaml-0.1.4.tar.gz$ cd yaml-0.1.4$ ./configure$ make$ make install# Install ruby$ wget http://ftp.ruby-lang.org/pub/ruby/1.9/ruby-1.9.3-p194.tar.gz$ tar zxf ruby-1.9.3-p194.tar.gz$ cd ruby-1.9.3-p194$ ./configure$ make$ make install# Update rubygems$ gem update --system$ gem install bundler#Test ruby and rubygems are working#Close shell and reopen for changes to take effect$ruby -v$gem --version# Rails$ yum install sqlite-devel$ gem install rails$ gem install sqlite3
Tuesday, 1 October 2013
How to Install Ruby & Rails on CentOS, Fedora or RedHat
Thursday, 12 September 2013
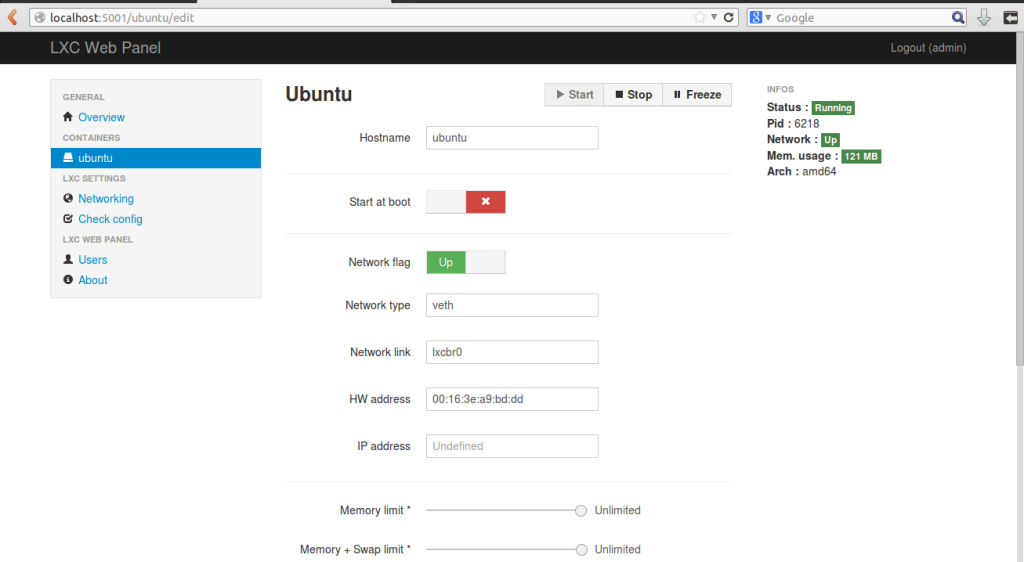
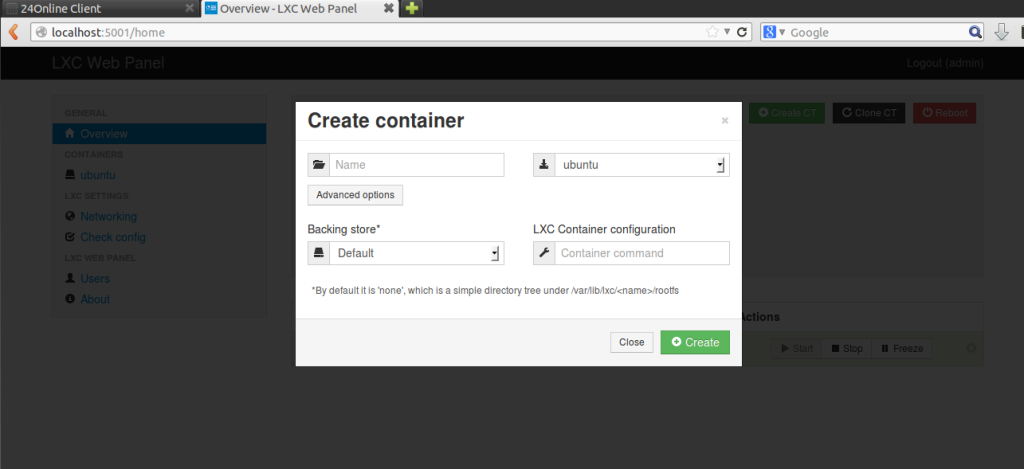
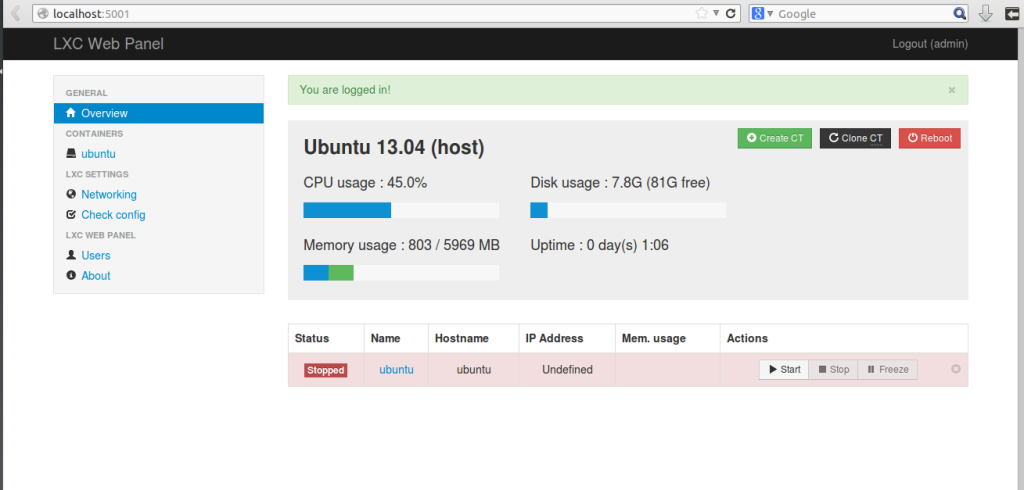
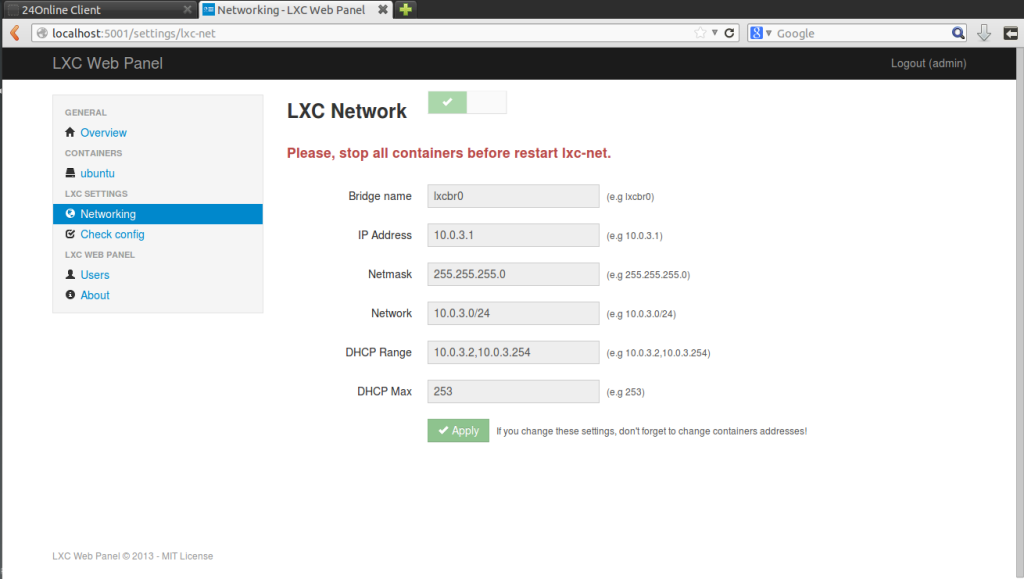
Installing LXC ( Linux Containers ) With LXC Web Pannel In Ubuntu
What is LXC
Linux Containers (LXC) are lightweight virtualization technology and provide a free software virtualization system for computers running GNU/Linux, This is accomplished through kernel level isolation, It allows one to run multiple virtual units (containers) simultaneously on the same host.- manage resources using PCG ( process control groups ) implemented via cgroup filesystem
- Resource isolation via new flags to the clone(2) system call (capable of create several types of new namespace for things like PIDs and network routing)
- Several additional isolation mechanisms (such as the “-o newinstance” flag to the devpts filesystem).
Installing LXC ( ubuntu 13.04 )
$ sudo apt-get install lxc
Creating container$ sudo lxc-create -t ubuntu -n ubuntu
$ sudo lxc-start -n ubuntu$ sudo lxc-console -n ubuntu -t 1
$ sudo apt-get install lxc debootstrap bridge-utils -y
$ sudo su
$ wget http://lxc-webpanel.github.com/tools/install.sh -O - | bashopen broswer
http://localhost:5000
username : admin
password admin

useful links :
- https://help.ubuntu.com/community/LXC
- https://help.ubuntu.com/12.04/serverguide/lxc.html
- http://lxc.sourceforge.net/index.php/about/lxc-development/
- http://lxc-webpanel.github.io
Source : http://www.computersnyou.com/2123/2013/07/installing-lxc-with-lxc-web-pannel-in-ubuntu/ By Alok Yadav On
Fail2Ban is an intrusion prevention framework written in the Python
Introduction
Fail2Ban is an intrusion prevention framework written in the Python programming language. It works by reading SSH, ProFTP, Apache logs etc.. and uses iptables profiles to block brute-force attempts.
Installation
To install fail2ban, type the following in the terminal:
sudo apt-get install fail2ban
Configuration
To configure fail2ban, make a 'local' copy the jail.conf file in /etc/fail2ban
cd /etc/fail2ban
sudo cp jail.conf jail.local
Now edit the file:
sudo nano jail.local
Set the IPs you want fail2ban to ignore, the ban time (in seconds) and maximum number of user attempts to your liking:
[DEFAULT]
# "ignoreip" can be an IP address, a CIDR mask or a DNS host
ignoreip = 127.0.0.1
bantime  = 3600
maxretry = 3
Email Notification
Note: You will need sendmail or any other MTA to do this.
If you wish to be notified of bans by email, modify this line with your email address:
destemail = your_email@domain.com
Then find the line:
action = %(action_)s
and change it to
action = %(action_mw)s
Jail Configuration
Jails are the rules which fail2ban apply to a given application/log:
[ssh]

enabled = true
port    = ssh
filter  = sshd
logpath  = /var/log/auth.log
maxretry = 3
To enable the other profiles, such as [ssh-ddos], make sure the first line beneath it reads:
enabled = true
Once done, restart fail2ban to put those settings into effect
sudo /etc/init.d/fail2ban restart
Advanced: Filters
If you wish to tweak or add log filters, you can find them in
/etc/fail2ban/filter.d
Testing
To test fail2ban, look at iptable rules:
sudo iptables -L
Attempt to login to a service that fail2ban is monitoring (preferably from another machine) and look at the iptable rules again to see if that IP source gets added.
External Links
- http://www.fail2ban.org/wiki/index.php/Main_Page - Official Fail2ban Website.
Remarks (Robert van Reems): To test fail2ban on Ubuntu 12.04 server edition a reboot is required. Restarting or reloading the service didn't work.
How To Setup a Local Clamav Update Server
1.Install base Ubuntu Server (we use 8.04 LTS)
2.Choose the Openssh and LAMP server options
3.Enable the backports reposistory in /etc/apt/sources.list, to get the latest client
4.Change the Document Root for Apache to /var/lib/clamav/
5.Create a daily update script to get the main.cvd and daily.cvd file
I called mine clamup.sh, and below is a listing of it's content:
#!/bin/sh
cd /tmp
wget http://database.clamav.net/daily.cvd
wget http://database.clamav.net/main.cvd
mv main.cvd /var/lib/clamav/
mv daily.cvd /var/lib/clamav/
apt-get update && apt-get upgrade -y && /etc/init.d/clamav-freshclam restart
The last line updates the system, and restarts freshclam.
If you don't want automatic updates, you can replace that line with:
/etc/init.d/clamav-freshclam restart
6. Create a script to update the 'thru the day' virus updates
I called mine clamsubver.sh, and below is the listing of it's content:
#!/bin/sh
cd /tmp
ver=`host -t txt current.cvd.clamav.net > /tmp/version.txt && awk -F":" '{print $3}' /tmp/version.txt`
dl="daily-$ver.cdiff"
wget http://database.clamav.net/$dl
mv /tmp/$dl /var/lib/clamav/
This script checks the Clam DNS record for latest version, and then downloads it.
7.setup cron to run both scripts. Mine looks like this:
59 11 * * * /sbin/clamup.sh
15 * * * * /sbin/clamsubver.sh
8.Now point your clients to update from your server, and watch it work.
All connections (or lack thereof) can be tracked in the server's apache access.log in /var/log/apache2
The Original Article was published on Ubuntu Forums by bigmeanogre
Wednesday, 11 September 2013
Solve Windowns 7 Network Connection Error
Finally i solve the issue.
Start => Run =>services.msc
You 'll found Netlogon services..
double click that service.after that select startup
Type : automatic =>Apply .
Then press Start ( this time start your netlogon service )
Apply==>OK If you find any other way please lets me know ..
Start => Run =>services.msc
You 'll found Netlogon services..
double click that service.after that select startup
Type : automatic =>Apply .
Then press Start ( this time start your netlogon service )
Apply==>OK If you find any other way please lets me know ..
Tuesday, 10 September 2013
Linux Containers on Virtualbox - Disposal Boxes by Michal Migurski's
Hey look, a month went by and I stopped blogging because I have a new job. Great.
One of my responsibilities is keeping an eye on our sprawling Github account, currently at 326 repositories and 151 members. The current fellows are working on a huge number of projects and I frequently need to be able to quickly install, test and run projects with a weirdly-large variety of backend and server technologies. So, it’s become incredibly important to me to be able to rapidly spin up disposable Linux web servers to test with. Seth clued me in to Linux Containers (LXC) for this:
This is a guide for creating an Ubuntu Linux virtual machine under Virtualbox to host individual containers with simple two-way network connectivity. You’ll be able to clone a container with a single command, and connect to it using a simple <container>.local host name.
Create a new Virtualbox virtual machine to boot from the Ubuntu installation ISO. For a root volume, I selected the VDI format with a size of 32GB. The disk image will expand as it’s allocated, so it won’t take up all that space right away. I manually created three partitions on the volume:
During the OS installation process, you’ll need to select a host name. I used “ubuntu-demo” for this demonstration.
Set up /etc/network/interfaces with two bridges for eth0 and eth1, both DHCP. Note that eth0 and eth1 must be commented-out, as in this sample part of my /etc/network/interfaces:


Shut down the Linux host, and add the secondary interface in Virtual box. Choose host-only networking, the vboxnet0 adapter, and “Allow All” promiscuous mode so that the containers can see inbound network traffic.

The primary interface will be NAT by default, which will carry normal out-bound internet traffic.
Modify the container’s network interfaces by editing /var/lib/lxc/base/rootfs/etc/network/interfaces (/var/lib/lxc/base/rootfs is the root filesystem of the new container) to look like this:
On the other hand, having ready access to a variety of local Linux environments has been a boon to my ability to quickly try out ideas. Special thanks again to Seth for helping me work through some of the networking ugliness.
Shift describes a Vagrant and LXC setup that skips Avahi and uses a plain hostnames for internal connectivity.
The Owner of this post is Michal Migurski
Find is Blog here http://mike.teczno.com/notes/disposable-virtualbox-lxc-environments.html
One of my responsibilities is keeping an eye on our sprawling Github account, currently at 326 repositories and 151 members. The current fellows are working on a huge number of projects and I frequently need to be able to quickly install, test and run projects with a weirdly-large variety of backend and server technologies. So, it’s become incredibly important to me to be able to rapidly spin up disposable Linux web servers to test with. Seth clued me in to Linux Containers (LXC) for this:
LXC provides operating system-level virtualization not via a full blown virtual machine, but rather provides a virtual environment that has its own process and network space. LXC relies on the Linux kernel cgroups functionality that became available in version 2.6.24, developed as part of LXC. … It is used by Heroku to provide separation between their “dynos.”I use a Mac, so I’m running these under Virtualbox. I move around between a number of different networks, so each server container had to have a no-hassle network connection. I’m also impatient, so I really needed to be able to clone these in seconds and have them ready to use.
This is a guide for creating an Ubuntu Linux virtual machine under Virtualbox to host individual containers with simple two-way network connectivity. You’ll be able to clone a container with a single command, and connect to it using a simple <container>.local host name.
The Linux Host
First, download an Ubuntu ISO. I try to stick to the long-term support releases, so I’m using Ubuntu 12.04 here. Get a copy of Virtualbox, also free.Create a new Virtualbox virtual machine to boot from the Ubuntu installation ISO. For a root volume, I selected the VDI format with a size of 32GB. The disk image will expand as it’s allocated, so it won’t take up all that space right away. I manually created three partitions on the volume:
- 4.0 GB ext4 primary.
- 512 MB swap, matching RAM size. Could use more.
- All remaining space btrfs, mounted at /var/lib/lxc.
During the OS installation process, you’ll need to select a host name. I used “ubuntu-demo” for this demonstration.
Host Linux Networking
Boot into Linux. I started by installing some basics, for me: git, vim, tcsh, screen, htop, and etckeeper.Set up /etc/network/interfaces with two bridges for eth0 and eth1, both DHCP. Note that eth0 and eth1 must be commented-out, as in this sample part of my /etc/network/interfaces:
## The primary network interface
#auto eth0
#iface eth0 inet dhcp

auto br0
iface br0 inet dhcp
        dns-nameservers 8.8.8.8
        bridge_ports eth0
        bridge_fd 0
        bridge_maxwait 0

auto br1
iface br1 inet dhcp
        bridge_ports eth1
        bridge_fd 0
        bridge_maxwait 0
Back in Virtualbox preferencese, create a new network adapter and call
it “vboxnet0”. My settings are 10.1.0.1, 255.255.255.0, with DHCP turned
on.
Shut down the Linux host, and add the secondary interface in Virtual box. Choose host-only networking, the vboxnet0 adapter, and “Allow All” promiscuous mode so that the containers can see inbound network traffic.
The primary interface will be NAT by default, which will carry normal out-bound internet traffic.
- Adapter 1: NAT (default)
- Adapter 2: Host-Only vboxnet0
% ping 8.8.8.8

PING 8.8.8.8 (8.8.8.8) 56(84) bytes of data.
64 bytes from 8.8.8.8: icmp_req=1 ttl=63 time=340 ms
…
Use ifconfig to find your Linux IP address (mine is 10.1.0.2), and try ssh’ing to that address from your Mac command line with the username you chose during initial Ubuntu installation.
% ifconfig br1

br1       Link encap:Ethernet  HWaddr 08:00:27:94:df:ed
          inet addr:10.1.0.2  Bcast:10.1.0.255  Mask:255.255.255.0
          inet6 addr: …
Next, we’ll set up Avahi to broadcast host names so we don’t need to remember DHCP-assigned IP addresses. On the Linux host, install avahi-daemon:
% apt-get install avahi-daemonIn the configuration file /etc/avahi/avahi-daemon.conf, change these lines to clarify that our host names need only work on the second, host-only network adapter:
allow-interfaces=br1,eth1
deny-interfaces=br0,eth0,lxcbr0
Then restart Avahi.
% sudo service avahi-daemon restartNow, you should be able to ping and ssh to ubuntu-demo.local from within the virtual machine and your Mac command line.
No Guest Containers
So far, we have a Linux virtual machine with a reliable two-way network connection that’s resilient to external network failures, available via a meaningful host name, and with a slightly funny disk setup. You could stop here, skipping the LXC steps and use Virtualbox’s built-in cloning functionality or something like Vagrant to set up fresh development environments. I’m going to keep going and set up LXC.Linux Guest Containers
Install LXC.% sudo apt-get lxcInitial LXC setup uses templates, and on Ubuntu there are several useful ones that come with the package. You can find them under /usr/lib/lxc/templates; I have templates for ubuntu, fedora, debian, opensuse, and other popular Linux distributions. To create a new container called “base” use lxc-create with a chosen template.
% sudo lxc-create -n base -t ubuntuThis takes a few minutes, because it needs retrieve a bunch of packages for a minimal Ubuntu system. You’ll see this message at some point:
##
# The default user is 'ubuntu' with password 'ubuntu'!
# Use the 'sudo' command to run tasks as root in the container.
##
Without starting the container, modify its network adapters to match the two we set up earlier. Edit the top of /var/lib/lxc/base/config to look something like this:
lxc.network.type=veth
lxc.network.link=br0
lxc.network.flags=up
lxc.network.hwaddr = 00:16:3e:c2:9d:71

lxc.network.type=veth
lxc.network.link=br1
lxc.network.flags=up
lxc.network.hwaddr = 00:16:3e:c2:9d:72
An initial MAC address will be randomly generated for you under lxc.network.hwaddr, just make sure that the second one is different.
Modify the container’s network interfaces by editing /var/lib/lxc/base/rootfs/etc/network/interfaces (/var/lib/lxc/base/rootfs is the root filesystem of the new container) to look like this:
auto eth0
iface eth0 inet dhcp
        dns-nameservers 8.8.8.8

auto eth1
iface eth1 inet dhcp
Now your container knows about two network adapters, and they have been
bridged to the Linux host OS virtual machine NAT and host-only adapters.
Start your new container:
% sudo lxc-start -n baseYou’ll see a normal Linux login screen at first, use the default username and password “ubuntu” and “ubuntu” from above. The system starts out with minimal packages. Install a few so you can get around, and include language-pack-en so you don’t get a bunch of annoying character set warnings:
% sudo apt-get install language-pack-en
% sudo apt-get install git vim tcsh screen htop etckeeper
% sudo apt-get install avahi-daemon
Make a similar change to the /etc/avahi/avahi-daemon.conf as above:
allow-interfaces=eth1
deny-interfaces=eth0
Shut down to return to the Linux host OS.
% sudo shutdown -h nowNow, restart the container with all the above modifications, in daemon mode.
% sudo lxc-start -d -n baseAfter it’s started up, you should be able to ping and ssh to base.local from your Linux host OS and your Mac.
% ssh ubuntu@base.local
Cloning a Container
Finally, we will clone the base container. If you’re curious about the effects of Btrfs, check the overall disk usage of the /var/lib/lxc volume where the containers are stored:% df -h /var/lib/lxc Filesystem Size Used Avail Use% Mounted on /dev/sda3 28G 572M 26G 3% /var/lib/lxcClone the base container to a new one, called “clone”.
% sudo lxc-clone -o base -n cloneLook at the disk usage again, and you will see that it’s not grown by much.
% df -h /var/lib/lxc

Filesystem      Size  Used Avail Use% Mounted on
/dev/sda3        28G  573M   26G   3% /var/lib/lxc
If you actually look at the disk usage of the individual container directories, you’ll see that Btrfs is allowing 1.1GB of files to live in just 573MB of space, representing the repeating base files between the two containers.
% sudo du -sch /var/lib/lxc/*

560M /var/lib/lxc/base
560M /var/lib/lxc/clone
1.1G total
You can now start the new clone container, connect to it and begin making changes.
% sudo lxc-start -d -n clone
% ssh ubuntu@clone.local
Conclusion
I have been using this setup for the past few weeks, currently with a half-dozen containers that I use for a variety of jobs: testing TileStache, installing Rails applications with RVM, serving Postgres data, and checking out new packages. One drawback that I have encountered is that as the disk image grows, my nightly time machine backups grow considerably. The Mac host OS can only see the Linux disk image as a single file.On the other hand, having ready access to a variety of local Linux environments has been a boon to my ability to quickly try out ideas. Special thanks again to Seth for helping me work through some of the networking ugliness.
Further Reading
Tao of Mac has an article on a similar, but slightly different Virtualbox and LXC setup. They don’t include the promiscuous mode setting for the second network adapter, which I think is why they advise using Avahi and port forwarding to connect to the machine. I believe my way here might be easier.Shift describes a Vagrant and LXC setup that skips Avahi and uses a plain hostnames for internal connectivity.
The Owner of this post is Michal Migurski
Find is Blog here http://mike.teczno.com/notes/disposable-virtualbox-lxc-environments.html
How to connect Windows Remote Desktop from Linux Step by Step
How to connect Windows Remote Desktop from Linux Step by Step
Connecting Windows
Remote Desktop from Linux
If you are running Centos (Linux system) and wanted to
connect Remote windows system from CentOS then you have to install rdesktop Remote
Desktop Client. Using rdesktop you can easily connect Windows system from Linux.
rdesktop is an open source client for Microsoft's RDP protocol. It work with
Windows NT 4 Terminal Server,2000, XP, 2003, 2003 R2, Vista, 2008, 7, and 2008
R2. And it support RDP Version 4 and 5.
Installing rdesktop:-
You can download
package go to http://pkgs.org as per your distribution. Or you can install
rdesktop from repository :-
For CentOS/RedHat:-
# yum
install rdesktop
For Ubuntu:-
# apt-get
install rdesktop
After that
you are ready to access Windows Remote Desktop from terminal with following
command. For more help use man command (man rdesktop)
# rdesktop
<Server Name OR IP Address>
Eg:-
# rdesktop
192.168.125
Subscribe to:
Comments (Atom)
Why PM2 Is Not Launching Your Node.js App—and How to Fix It
Why PM2 Is Not Launching Your Node.js App—and How to Fix It Broken Your Node.js PM2 — and How to Fix It Have you ever...
-
How To Hide and unhide the hard disk Volumes using CMD Commands : First check how many drives are there in my computer and then s...
-
In the rapidly evolving landscape of software development, the term " DevOps " has gained significant prominence. DevOps, short fo...
-
While learning Terraform some time back, I wanted to leverage Availability Zones in Azure. I was specifically looking at Virtual Machine Sca...


