Friday, 4 August 2023

From Silos to Success: How DevOps Transforms Development and Operations


In the rapidly evolving landscape of software development, the term "DevOps" has gained significant prominence.

DevOps, short for combination of work and efforts from Development teams and Operations teams, represents a collaborative and holistic approach to software development and deployment...                


It aims to break down traditional silos between development and IT operations teams, fostering a culture of seamless communication, continuous integration, and rapid delivery. This article provides an introduction to the concept of DevOps, its principles, benefits, and its role in modern software development.

**Understanding DevOps:**

DevOps is a methodology that emphasises the collaboration and cooperation of software development (Dev) and IT operations (Ops) teams throughout the entire software development lifecycle. 

Traditionally, these two functions worked in isolation, leading to communication gaps, slower release cycles, and a lack of accountability in case of issues. DevOps seeks to bridge this gap by promoting shared responsibilities and a more streamlined approach.

**Key Principles of DevOps:**

1. **Collaboration:**DevOps encourages open communication and cooperation between developers, testers, and operations teams. This helps in identifying and addressing potential problems early in the development process.


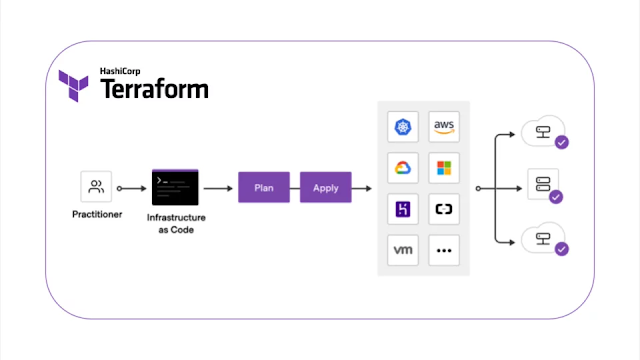
2. **Automation:** Automation is a core principle of DevOps. By automating tasks like testing, deployment, and infrastructure provisioning, teams can reduce human errors, improve efficiency, and ensure consistent processes.


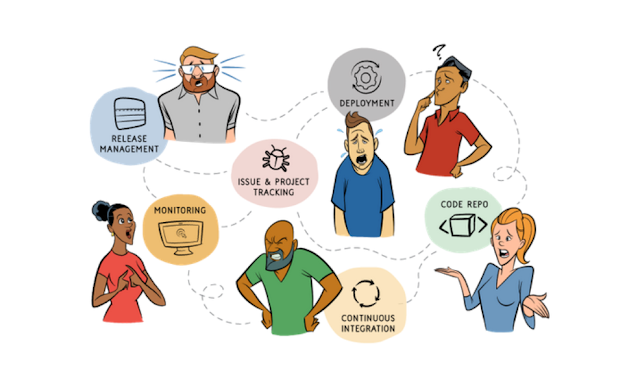
e.g. Example of DevOps LifeCycle - planning your platform and mapping out what you need to accomplish at each step


3. **Continuous Integration (CI):**CI involves integrating code changes from multiple developers into a shared repository several times a day. This ensures that new code is regularly tested and merged, reducing integration issues and improving software quality.


4. **Continuous Delivery (CD):** CD builds upon CI by automating the deployment process. It allows for the rapid and reliable release of software updates to production environments, minimising manual interventions and reducing deployment risks.


5. **Monitoring and Feedback:**DevOps emphasises real-time monitoring of applications and infrastructure. This helps teams identify performance bottlenecks, security vulnerabilities, and other issues, enabling quick remediation.


DevOps LifeCycle
e.g - Of DevOps Lifecycle

[ “ While Talking to customers, we found that while automating the continuous delivery pipeline was important, the missing part was enabling the feedback loop,” Monitoring and logging software packages are rapidly converging on the notion of becoming “DevOps hubs” ]

**Benefits of DevOps:**

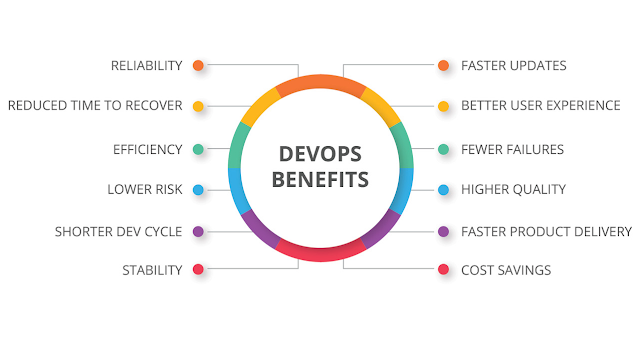
1. **Faster Time to Market:** DevOps practices enable quicker development cycles and faster release of features or updates, allowing businesses to respond to market demands more effectively.


2. **Improved Collaboration:** DevOps breaks down barriers between teams, fostering better understanding and cooperation, which ultimately leads to improved software quality.


3. **Enhanced Reliability:** Automation and continuous testing ensure that changes are thoroughly tested and consistently deployed, reducing the likelihood of failures in production environments.


4. **Scalability:** DevOps practices, combined with cloud technologies, allow applications to scale seamlessly according to demand.


5. **Higher Quality Software:**Continuous testing and feedback loops lead to higher software quality, as issues are identified and addressed early in the development process.


**Conclusion:**

DevOps represents a paradigm shift in software development, moving away from traditional, siloed approaches towards a collaborative, automated, and customer-focused methodology. By promoting a culture of collaboration, automation, and continuous improvement. 

DevOps has become an essential framework for organisations looking to accelerate their software development lifecycle, enhance software quality, and meet the ever-changing demands of the modern market. Embracing DevOps principles can lead to more efficient, reliable, and successful software development projects.

Saturday, 22 July 2023

Mastering Docker Minified Systems: A Step-by-Step Guide with Real Use Cases

Introduction

Docker is a powerful platform for developing, shipping, and running applications. Minified Docker systems are optimized for size and efficiency, making them ideal for production environments where resources are at a premium.

Step 1: Understanding Docker Basics

Before diving into minified systems, ensure you have a solid understanding of Docker concepts like images, containers, volumes, and networks.

Key Commands:

docker pull [image_name] # Download an image from Docker Hub
docker run -d --name [container_name] [image_name] # Run a container in detached mode

Step 2: Creating a Minified Dockerfile

A minified Dockerfile contains only the essential layers needed to run your application.

Example Dockerfile:

FROM alpine:latest
RUN apk add --no-cache python3 py3-pip
COPY . /app
WORKDIR /app
RUN pip install -r requirements.txt
CMD ["python3", "app.py"]

Step 3: Building and Running Your Minified Container

Build your image with the Docker build command, tagging it appropriately.

Build Command:

docker build -t my-minified-app .

Step 4: Optimizing Your Image

Use multi-stage builds to reduce size and remove unnecessary build dependencies.

Multi-Stage Dockerfile:

# Build stage
FROM python:3.8-slim as builder
COPY requirements.txt .
RUN pip install --user -r requirements.txt
# Final stage
FROM python:3.8-alpine
COPY --from=builder /root/.local /root/.local
COPY . .
CMD ["python", "./app.py"]

Step 5: Managing Data and State

For stateful applications, use volumes to persist data.

Volume Command:

docker volume create my_volume
docker run -d -v my_volume:/data my-minified-app

Step 6: Networking and Communication

Link containers and enable communication between them using Docker networks.

Network Commands:

docker network create my_network
docker run -d --net=my_network my-minified-app

Step 7: Deploying to Production

Deploy your containerized application using orchestration tools like Docker Swarm or Kubernetes.

Step 8: Monitoring and Maintenance

Monitor your containers and systems using tools like Docker stats, cAdvisor, or Prometheus.

Conclusion

Mastering Docker minified systems involves understanding Docker fundamentals, optimizing Dockerfiles, managing data, and deploying efficiently.

Further Learning

Remember, practice makes perfect. Start small, iterate, and gradually incorporate these practices into larger projects.

OBs:

Docker is an open platform for developing, shipping, and running applications. Docker enables you to separate your applications from your infrastructure so you can deliver software quickly. 


With Docker, you can manage your infrastructure in the same ways you manage your applications. By taking advantage of Docker’s methodologies for shipping, testing, and deploying code quickly, you can significantly reduce the delay between writing code and running it in production.

Certainly! Here’s an extensive guide titled “Mastering Docker Minified Systems: A Step-by-Step Guide with Real Use Cases.” ]


This guide provides a foundational understanding of working with minified Docker systems. For more in-depth learning, refer to the provided links and continue exploring real-world use cases. Happy Dockering!

Thursday, 6 April 2023

What would happen if a non-technological person found himself in the world of high technology?

If a non-technological person found themselves in a world of high technology, they would likely experience a significant culture shock. 

The rapid pace of technological advancements in the modern world could be overwhelming to someone who is not accustomed to it. They may find it difficult to keep up with the latest technologies and the ever-evolving digital landscape.

In some cases, the non-technological person may feel intimidated or even frightened by the advanced technology around them. They may struggle to understand the terminology and concepts used in the tech industry, which can make it challenging to communicate with others and to participate in the tech-driven economy.

On the other hand, if the person is willing to learn and adapt, they may find that the high-tech world offers many opportunities for growth and advancement. 

They could learn new skills and technologies that could help them succeed in their career or personal life.

Ultimately, whether a non-technological person thrives or struggles in a high-tech world depends on their openness to learning and their willingness to adapt to new technologies and ways of thinking.

PS I love you. And i asked the Ask AI app to write this for me. 

Get it for free --> https://get-askai.app

Wednesday, 23 March 2022

Terraform Availability Zone on Azure Deployment. Documentation and Good Examples Missing..


While learning Terraform some time back, I wanted to leverage Availability Zones in Azure. I was specifically looking at Virtual Machine Scale Sets.  https://www.terraform.io/docs/providers/azurerm/r/virtual_machine_scale_set.html 

Looking at the documentation Terraform has, I noticed there is no good example on using zones. So, I tried a few things to see what was really needed for that field. While doing some research, I noticed there are many people in the same situation. No good examples. I figured I'd create this post to help anyone else. And, of course, it's a good reminder for me too if I forget the syntax on how I did this.

Here's a very simple Terraform file. I just created a new folder then a new file called zones.tf. Here's the contents:

variable "location" {
description = "The location where resources will be created"
default = "centralus"
type = string
}

locals {
regions_with_availability_zones = ["centralus","eastus2","eastus","westus"]
zones = contains(local.regions_with_availability_zones, var.location) ? list("1","2","3") : null
}

output "zones" {
value = local.zones
}


The variable 'location' is allowed to be changed from outside the script. But, I used 'locals' for variables I didn't want to be changed from outside. I hard coded a list of Azure regions that have availability zones. Right now it's just a list of regions in the United States. Of course, this is easily modifiable to add other regions.

The 'zones' local variable uses the contains function to see if the specified region is in that array. If so, then the value is a list of strings. Else it's null. This is important. The zones field in Azure resources required either a list of strings or null. An empty list didn't work for me.

As it is right now, you can run the Terraform Apply command and you should see some output. Changing the value of the location variable to something not in the list and you may not see output at all simply because the value is null.

Now, looking at a partial example from the Terraform documentation:

resource "azurerm_virtual_machine_scale_set" "example" { name = "mytestscaleset-1" location = var.location resource_group_name = "${azurerm_resource_group.example.name}" upgrade_policy_mode = "Manual" zones = local.zones

Now the zones field can be used safely when the value is either a list of strings or null. After I ran the complete Terraform script for VM Scale Set, I went to the Azure Portal to verify it worked.

I also changed the specified region to one that I know does not use Availability Zones, South Central US.

This proved to me that I can use a region with and without availability zones in the same Terraform script.

For a list of Azure regions with Availability Zones, see:
https://docs.microsoft.com/en-us/azure/availability-zones/az-overview

Tuesday, 12 November 2019

Changing Perpectives into DevSecOPs - Playing around with ParrotOS


For quite sometime, I have refrain myself to keep this blog updated. The last time I did published something was around March this year (2019). Uhmm, I guess I've being a bit lazy I'd say ..

Lolo 😀 ..

Joke apart - today, I am starting a series of blog post for around stuff, I am currently working on..

And this is post is around ParrotOS ..

Due to the nature of this post, I'll presume the reader is familiar with ParrotOS - if not the please have read more about ParrotOS .. As I will not explain it here.

So - Today I did quick refreshment into the ParrotOS VM instance I have installed on VMware Workstation *[https://www.vmware.com/products/workstation-pro.html ]. I haven't used if for quite a while so, it was a bit rustier, therefore I need to updated it.

Whoever the ParrotOS update command was failing with error:

code: [
Temporary failure resolving ‘deb.parrot.sh”

Fig - 01


- As per the screenshot shows, I was unable to connect into Update ParrotOS or connect into the web, as the DNS was not resolving.

Fig. 02


- Neither ping commands worked.

--
After some search into Google here is how I did resolved this..


- By updating the DNS record I was able to then Connect into the internet .. Also you can check the following file:
 ==> $ cat /etc/resolv.conf

*Optional*  - I would advice you to add temporarily
 ==> $ echo >> "nameserver 1.1.1.1" /etc/resolv.conf

It started work afterwards ..


As also was by then able to update the OS;


As still working.. Hope this helps whoever struggles to connect your VM or main machine into the internet.

===> $ sudo anosurf dns


Till next post  :-) 

Friday, 29 March 2019

What is Kubernetes? Container orchestration explained


Docker containers have reshaped the way people think about developing, deploying, and maintaining software. Drawing on the native isolation capabilities of modern operating systems, containers support VM-like separation of concerns, but with far less overhead and far greater flexibility of deployment than hypervisor-based virtual machines.


Containers are so lightweight and flexible, they have given rise to new application architectures. The new approach is to package the different services that constitute an application into separate containers, and to deploy those containers across a cluster of physical or virtual machines. This gives rise to the need for container orchestration—a tool that automates the deployment, management, scaling, networking, and availability of container-based applications.


Enter Kubernetes. This open source project spun out of Google automates the process of deploying and managing multi-container applications at scale. While Kubernetes works mainly with Docker, it can also work with any container system that conforms to the Open Container Initiative (OCI) standards for container image formats and runtimes. And because Kubernetes is open source, with relatively few restrictions on how it can be used, it can be used freely by anyone who wants to run containers, most anywhere they want to run them.

Friday, 24 August 2018

Get Docker for Debian Up and Running

Estimated reading time: 9 minutes
To get started with Docker on Debian, make sure you meet the prerequisites, then install Docker.

Prerequisites

Docker EE customers

Docker EE is not supported on Debian. For a list of supported operating systems and distributions for different Docker editions, see Docker variants.

OS requirements

To install Docker, you need the 64-bit version of one of these Debian or Raspbian versions:

  • Stretch (testing)
  • Jessie 8.0 (LTS) / Raspbian Jessie
  • Wheezy 7.7 (LTS)
Docker CE is supported on both x86_64 and armhf architectures for Jessie and Stretch.

Uninstall old versions

Older versions of Docker were called docker or docker-engine. If these are installed, uninstall them:

$ sudo apt-get remove docker docker-engine
It’s OK if apt-get reports that none of these packages are installed.

The contents of /var/lib/docker/, including images, containers, volumes, and networks, are preserved. The Docker CE package is now called docker-ce.

Extra steps for Wheezy 7.7

  • You need at least version 3.10 of the Linux kernel. Debian Wheezy ships with version 3.2, so you may need to update the kernel. To check your kernel version:

    $ uname -r
  • Enable the backports repository. See the Debian documentation.

Install Docker CE

You can install Docker CE in different ways, depending on your needs:

  • Most users set up Docker’s repositories and install from them, for ease of installation and upgrade tasks. This is the recommended approach.
  • Some users download the DEB package and install it manually and manage upgrades completely manually. This is useful in situations such as installing Docker on air-gapped systems with no access to the internet.

Install using the repository

Before you install Docker CE for the first time on a new host machine, you need to set up the Docker repository. Afterward, you can install and update Docker from the repository.

Set up the repository

  1. Install packages to allow apt to use a repository over HTTPS:

    Jessie or Stretch:

    $ sudo apt-get install \
         apt-transport-https \
         ca-certificates \
         curl \
         gnupg2 \
         software-properties-common
    Wheezy:

    $ sudo apt-get install \
         apt-transport-https \
         ca-certificates \
         curl \
         python-software-properties
  2. Add Docker’s official GPG key:

    $ curl -fsSL https://download.docker.com/linux/debian/gpg | sudo apt-key add -
    Verify that the key ID is 9DC8 5822 9FC7 DD38 854A E2D8 8D81 803C 0EBF CD88.

    $ sudo apt-key fingerprint 0EBFCD88

    pub   4096R/0EBFCD88 2017-02-22
          Key fingerprint = 9DC8 5822 9FC7 DD38 854A  E2D8 8D81 803C 0EBF CD88
    uid                  Docker Release (CE deb) <docker@docker.com>
    sub   4096R/F273FCD8 2017-02-22
  3. Use the following command to set up the stable repository. You always need the stable repository, even if you want to install edge builds as well.

    Note: The lsb_release -cs sub-command below returns the name of your Debian distribution, such as jessie.


    To also add the edge repository, add edge after stable on the last line of the command.

    amd64:

    $ sudo add-apt-repository \
       "deb [arch=amd64] https://download.docker.com/linux/debian \
       $(lsb_release -cs) \
       stable"
    armhf:

    You can choose between two methods for armhf. You can use the same method as Debian, setting up the repository and using apt-get install, or you can use a convenience script, which requires privileged access, but sets up the repository for you and installs the packages for Bash auto-completion.
    • Setting up the repository directly:

      $ echo "deb [arch=armhf] https://apt.dockerproject.org/repo \
          raspbian-jessie main" | \
          sudo tee /etc/apt/sources.list.d/docker.list
    • Using the convenience script:

      $ curl -sSL https://get.docker.com > install.sh

      $ sudo bash ./install.sh
      Warning: Always audit scripts downloaded from the internet before running them locally.


      If you use this method, Docker is installed and starts automatically. Skip to step 4 below.
  4. Wheezy only: The version of add-apt-repository on Wheezy adds a deb-src repository that does not exist. You need to comment out this repository or running apt-get update will fail. Edit /etc/apt/sources.list. Find the line like the following, and comment it out or remove it:

    deb-src [arch=amd64] https://download.docker.com/linux/debian wheezy stable
    Save and exit the file.

    Learn about stable and edge channels.

Install Docker CE

NOTE: Docker CE is not available on raspbian-jessie, scroll down to follow the Raspian steps.

  1. Update the apt package index.

    $ sudo apt-get update
  2. Install the latest version of Docker, or go to the next step to install a specific version. Any existing installation of Docker is replaced.

    Use this command to install the latest version of Docker:

    $ sudo apt-get install docker-ce
    Warning: If you have multiple Docker repositories enabled, installing or updating without specifying a version in the apt-get install or apt-get update command will always install the highest possible version, which may not be appropriate for your stability needs.

  3. On production systems, you should install a specific version of Docker instead of always using the latest. This output is truncated. List the available versions:

    $ apt-cache madison docker-ce

    docker-ce | 17.03.0~ce-0~debian-jessie | https://download.docker.com/linux/debian jessie/stable amd64 Packages
    The contents of the list depend upon which repositories are enabled, and will be specific to your version of Debian (indicated by the jessie suffix on the version, in this example). Choose a specific version to install. The second column is the version string. The third column is the repository name, which indicates which repository the package is from and by extension its stability level. To install a specific version, append the version string to the package name and separate them by an equals sign (=):

    $ sudo apt-get install docker-ce=<VERSION_STRING>
    The Docker daemon starts automatically.
  4. Verify that Docker CE is installed correctly by running the hello-world image.

    $ sudo docker run hello-world
    This command downloads a test image and runs it in a container. When the container runs, it prints an informational message and exits.
Docker CE is installed and running. You need to use sudo to run Docker commands. Continue to Linux postinstall to allow non-privileged users to run Docker commands and for other optional configuration steps.

Upgrade Docker CE

To upgrade Docker, first run sudo apt-get update, then follow the installation instructions, choosing the new version you want to install.

Install on Raspian (Raspberry Pi)

Warning: This isn’t necessary if you used the recommended bash $ curl -sSL https://get.docker.com | sh command!

Once you have added the Docker repo to /etc/apt/sources.list.d/, you should see docker.list if you:

$ ls /etc/apt/sources.list.d/
And the contents of the docker.list should read:

deb [arch=armhf] https://apt.dockerproject.org/repo raspbian-jessie main

If you don’t see that in docker.list, then either comment the line out, or rm the docker.list file.

Once you have verified that you have the correct repository, you may continue installing Docker.

  1. Update the apt package index.

    $ sudo apt-get update
  2. Install the latest version of Docker, or go to the next step to install a specific version. Any existing installation of Docker is replaced.

    Use this command to install the latest version of Docker:

    $ sudo apt-get install docker
    NOTE: By default, Docker on Raspian is Docker Community Edition, so there is no need to specify docker-ce.


    NOTE: If bash $ curl -sSL https://get.docker.com | sh isn’t used, then docker won’t have auto-completion! You’ll have to add it manually.

  3. Verify that Docker is installed correctly by running the hello-world image.

    $ sudo docker run hypriot/armhf-hello-world
    This command downloads a test image and runs it in a container. When the container runs, it prints an informational message and exits.

Install from a package

If you cannot use Docker’s repository to install Docker CE, you can download the .deb file for your release and install it manually. You will need to download a new file each time you want to upgrade Docker.

  1. Go to https://download.docker.com/linux/debian/dists/, choose your Debian version, browse to stable/pool/stable/, choose either amd64 or armhf,and download the .deb file for the Docker version you want to install and for your version of Debian.

    Note: To install an edge package, change the word stable in the URL to edge. Learn about stable and edge channels.

  2. Install Docker CE, changing the path below to the path where you downloaded the Docker package.

    $ sudo dpkg -i /path/to/package.deb
    The Docker daemon starts automatically.
  3. Verify that Docker CE is installed correctly by running the hello-world image.

    $ sudo docker run hello-world
    This command downloads a test image and runs it in a container. When the container runs, it prints an informational message and exits.
Docker CE is installed and running. You need to use sudo to run Docker commands. Continue to Post-installation steps for Linux to allow non-privileged users to run Docker commands and for other optional configuration steps.

Upgrade Docker

To upgrade Docker, download the newer package file and repeat the installation procedure, pointing to the new file.

Uninstall Docker

  1. Uninstall the Docker package:

    $ sudo apt-get purge docker-ce
  2. Images, containers, volumes, or customized configuration files on your host are not automatically removed. To delete all images, containers, and volumes:

    $ sudo rm -rf /var/lib/docker
You must delete any edited configuration files manually.

Next steps


How to check for open ports on Linux

Checking for open ports is among the first steps to secure your device. Listening services may be the entrance for attackers who may exploit...